Requirements
IPA/Cascade is a Pylons web application, and requires Pylons version 1.0 or greater. Pylons, in turn, depends on a number of Python modules. If you install Pylons with a package manager like Python's easy_install, Fedora/Redhat's yum, or the Macports port command, these should be installed automatically, but if they are not, this list is current as of the Pylons 1.0 release:
beaker, decorator, formencode, mako, myghty, nose, paste, paste-deploy,
paste-script, routes, simplejson, tempita, weberror, webhelpers, webob,
webtest
In addition to Pylons and its dependencies, you'll need a web server. Pylons installs the Paste HTTP server, but for a production environment, you'll probably want to use Apache 2.2+ with the mod_wsgi adapter module.
The Cascade applcation also requires the following packages:
- netsa-python (Python support module)
- DBUtils (for database connection pooling)
- psycopg2 (database driver for PostgreSQL)
Depending on the type of web authentication you'll be using, you will need some additional modules:
For form-based password logins via PAM:
For Kerberos authentication via GSSAPI:
Finally, you'll need the ipa-python module (included in the ipa distribution) installed.
Installation
Follow these steps to install Cascade on your web server.
Copy the contents of the cascade directory to a location where Apache will have read access.
Change to the directory you created above, and in the apache/ subdirectory, copy the file cascade.wsgi.sample to cascade.wsgi. Edit this file, replacing the sample path /var/www/html/cascade with the directory you created above.
- Depending on your system configuration, you may need to uncomment and edit the line containing sys.path.append to reflect the location where Python packages are installed on your system.
- You may also need to edit the os.environ['PYTHON_EGG_CACHE'] variable, replacing the sample location with a location writable by the Apache process.
Create an Apache httpd.conf entry for the application.
- If you are installing the application in a dedicated Apache instance, use the included apache/cascade.httpd.conf.sample file as a template, replacing the sample path /var/www/html/cascade with the directory you created in step 1.
- If you are installing the application on a virtual host server, use the included apache/cascade.httpd.conf.sample file as a template, replacing the sample path /var/www/html/cascade with the directory you created in step 1, and replacing the server name ipa.example.com with the fully-qualified DNS name for the virtual host.
Create the production.ini file in the cascade application directory.
Copy the production.ini.sample file to production.ini, making the necessary changes for your setup.
- At minimum, you'll need to change the ipa_db_uri setting to reflect the URI of your IPA database.
- You also might want to edit the ipa_user_path setting to reflect where you'd like user catalog data to live in the IPA catalog
- Take note of the value of the cache_dir variable -- this is the location where Apache will create session and cache data. The sample value, %(here)s/apache/data, places this data in the apache/data subdirectory of the Cascade application directory. You will need to make sure this directory exists and is writable the Apache process.
To maintain IPA using Cascade, you'll need to create a user in IPA that has administrative access. To do this, connect to the IPA database with a psql prompt and run the following:
SELECT add_user ('myusername', 'Firstname Lastname', 'g_ipa_admin');Replace 'myusername' with the username of the administrative user you want to create. This username must match the user name of the PAM user or Kerberos principal for the administrator.
If you're going to use Kerberos to authenticate users, follow the sequence of steps in README.kerberos to configure IPA/Cascade for Kerberos. Otherwise, continue with the next step.
Upon restarting apache, open the URL of the Cascade application in a browser. The default URL is http://<server>/cascade, but may be different depending on the directory you chose above.
- If you're using PAM authentication, you should get a login page. If so, log in with the administrative user you created above.
- If you're using Kerberos authentication, credentials should be obtained via Kerberos, which may or may not require you to enter your password in the browser.
You should now have a working IPA/Cascade install, and can begin using it to query and maintain IPA data.
Using IPA/Cascade
Once you're logged into the application, you'll see a navigation bar at the top of the page with the following pages:
Associations
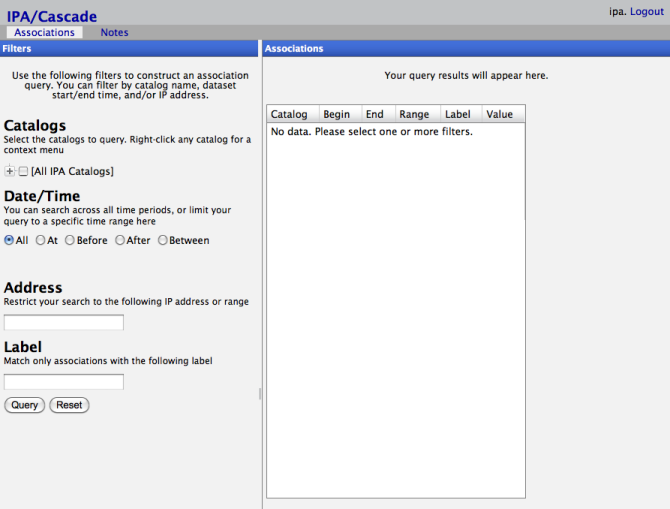
An IPA association is a mapping of an IP address to a set of attributes during a specified time interval. The IPA/Cascade associations interface allows you to query associations by catalog, dataset, time range, address, or label. These filters are shown on the left side of the page. Results will appear in the table on the right side.
Association Queries
Use the filters in the left column to define the parameters of your query, then click the Query button to perform the query.
Filtering Associations by Catalog and Dataset
The filter panel contains a hierarchical display of catalogs and datasets in the database under the heading Catalogs. Nodes with a + sign next to them can be expanded to show child catalogs and datasets within that catalog.
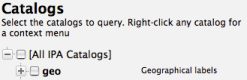
To select a catalog for inclusion in your query, check the box next to the catalog name. Selecting a catalog also selects all children of that catalog, but you may manually deselect children you wish to exclude from the query if you wish.
Each catalog's datasets are merged into a single node underneath the catalog with a count of the datasets and the time range covered by all of the datasets.

To view the individual datasets, double-click this node. Individual datasets within a catalog can then included in your query by clicking on them to highlight the dataset in the table.
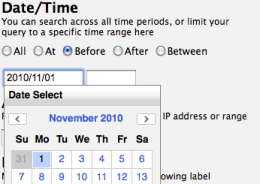
Filtering Associations by Time Range
Under the Date/Time heading, you can specify a date range within which to perform your association query. The radio button group is used to select the type of time range query, which can be:
- All - query associations during any time interval (the default)
- At - query only those associations valid at a given time
- Before - query only those associations valid before a given time
- After - query only those associations valid after a given time
- Between - query only those associations valid during a specified time range
When this radio group has a value other than All, a set of time fields will appear for you to enter a date/time. Dates should be entered in YYYY/MM/DD format, or you can use the pop-up calendar to select a date. Times should be entered in 24-hour format. In the case of a Between query, you'll need to select both the start and end date/times to form a complete time range.
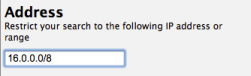
Filtering Associations by IP Address Range
Use the Address filter to limit your query to associations that intersect with a chosen IP range. This can be a single address, an address range in the form a.b.c.d-e.f.g.h, or a CIDR block in the form a.b.c.d/n.
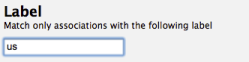
Filtering Associations by Label
Use the Label filter to limit your query to associations with the given label. Labels are only used for prefix map and multimap catalogs in IPA, so be aware that using this filter will not return any associations in IP set catalogs.
Association Query Results
Results will appear in the associations table on the right side of the page.
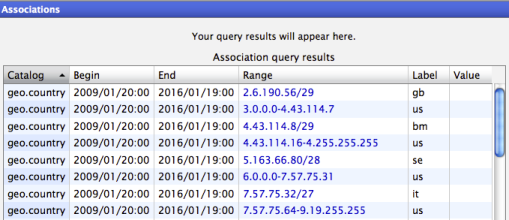
For queries that return more than a few records, you may need to scroll the table to the bottom to load the next batch of results. An indicator will appear at the bottom of the table showing how many more records are left.

Clicking on the IP range of any association will filter the query to only contain IP ranges that intersect with that range. This is useful for looking at what other information is known about that IP addres or range. Double-clicking on any association record will open a window with a list of notes referencing the association's address range. See the Notes section below for more information about how notes relate to associations.
Managing Catalogs
In the catalog tree on the left side of the page, you will see a hierarchy of association catalogs in the IPA database. To add a new association catalog, right-click on the parent catalog and select Add a catalog from the context menu, then give it a name and a short description.
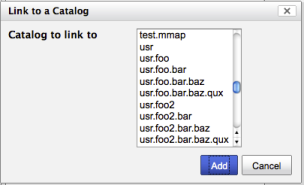
You can also create a link to another catalog in the database. This is useful for keeping shortcuts to system catalogs in your user catalog for easy access. This can be accomplished by right-clicking on the catalog where you want to create the link and selecting Create a catalog link from the context menu. Select the catalog to link to, keeping in mind you won'ty be allowed to link to a catalog that would create a cycle in the catalog hierarchy (e.g. you can't link to usr.ipa from usr.ipa.foo).
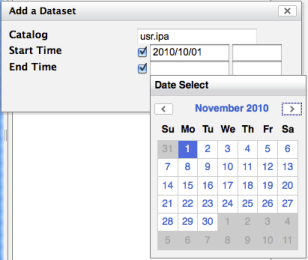
Managing Datasets
Within each association catalog, associations are organized into datasets based on the time interval when the associations are active. To create a new dataset, right-click on a catalog and select Add a dataset from the context menu. You can then give the dataset a start and end time using text entry or a pop-up calendar widget. Note that either the start or end time may be omitted by clearing the check-box next to the date, in which case the dataset's time interval will be unbounded on that end of the interval.
Managing Associations
Once you've created a dataset within the catalog, you can begin adding associations to it. To do so, right-click the catalog and select View datasets from the context menu, then double-click a dataset to open it. You'll see the associations in the dataset in the associations table. To add new associations, use the text fields below the table to add the IP range and an optional label and value for the association, then click the Add button to add the association to the dataset.
Notes
Notes are a lightweight alternative to IP associations, best suited for quick comments about an IP address or range. Whereas associations require that you adhere to a structure within datasets and catalogs, notes are simply free-form textual comments about an IP address range at a given time.
The layout of the notes page is similar to that of the associations page:
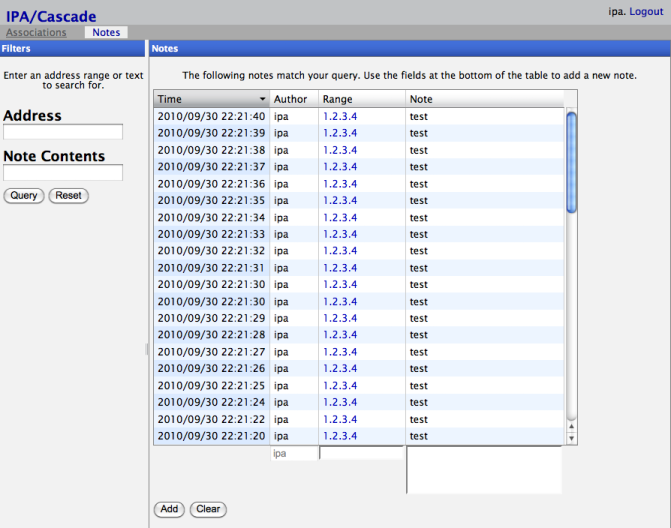
Adding Notes
To add a note, enter the IP range and the note contents into the fields at the bottom of the Notes table, then clicking the Add button. Along with the range and note contents, a note record contains the creation timestamp and the username of the user that created it.

Note Queries
Note queries can be performed using an IP address range or a text search of the note contents. Enter your query terms in the appropriate fields and click Query to return notes matching those terms.
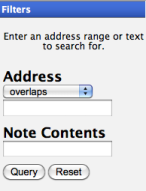
To retrieve notes corresponding to a given IP address or range, enter the address or range into the Address field. Range queries can be performed using the "overlaps", "contains", or "is contained by" operators, selectable from the drop-down menu. To retrieve notes containing a search term in the note contents, enter the search term in the Note Contents field. For more advanced queries of note contents, PostgreSQL tsquery syntax is supported, e.g.:
dns & !update
Like the association table, the notes table appends records when scrolling reaches the end of the table, or displays "End of results" when no more records are available.
Administration
The administration menu contains functionality reserved for priveleged users.
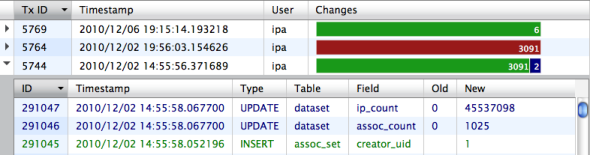
Auditing
The auditing page, available only to users with the "Auditor" or "Administrator" roles, shows the most recent changes to the IPA database. Changes are presented in a table, sorted by most recent timestamp, of database transactions.
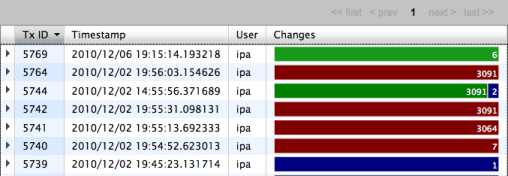
To view the details of a transaction, click the arrow in the leftmost column to expand the row. This inner table can be scrolled to view all of the fields that were added/updated/deleted as part of that transaction.
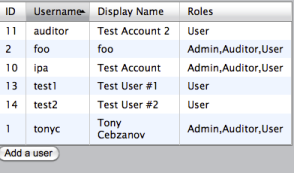
Users
The user administration page, available only to users with the "Administrator" role, shows a list of all IPA user accounts.
Adding Users
From this page, administrators can add users by clicking the Add button and filling out the dialog box.
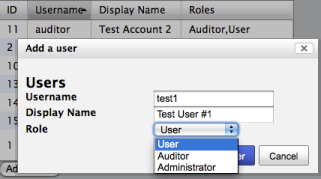
Give the user a username, a display name, and choose a role from the dropdown list, then click "Create User" to add the user to the system.
Modifying Users
To modify an existing user, simply double-click on the user's row in the user table, or right-click and select "Modify User" from the context menu.
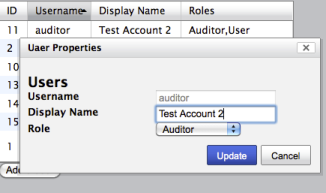
Make the necessary changes, then click "Update" to save the changes.
Deleting a User
To delete a user, right-click on the user you want to delete and selecting "Delete user" from the context menu.
Note that deletion of users that have added association datasets or notes to IPA is prohibited. You will first need to update ownership of these records to another user or delete the data in question before deleting the users who own the data. This is a safety measure to avoid losing important data when users are removed from the system.
