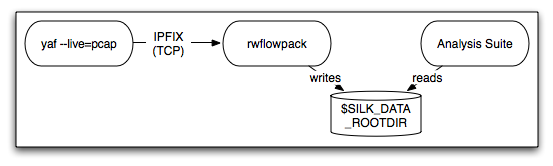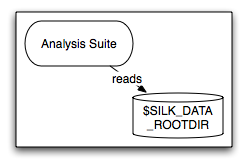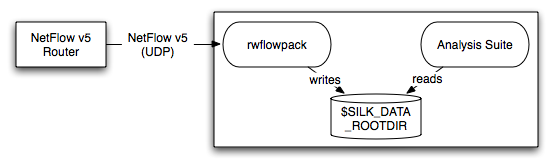
Figure 1.1: Single machine operation with NetFlow sensor
SiLK 3.24
Copyright 2025 Carnegie Mellon University.
NO WARRANTY. THIS CARNEGIE MELLON UNIVERSITY AND SOFTWARE ENGINEERING INSTITUTE MATERIAL IS FURNISHED ON AN ”AS-IS” BASIS. CARNEGIE MELLON UNIVERSITY MAKES NO WARRANTIES OF ANY KIND, EITHER EXPRESSED OR IMPLIED, AS TO ANY MATTER INCLUDING, BUT NOT LIMITED TO, WARRANTY OF FITNESS FOR PURPOSE OR MERCHANTABILITY, EXCLUSIVITY, OR RESULTS OBTAINED FROM USE OF THE MATERIAL. CARNEGIE MELLON UNIVERSITY DOES NOT MAKE ANY WARRANTY OF ANY KIND WITH RESPECT TO FREEDOM FROM PATENT, TRADEMARK, OR COPYRIGHT INFRINGEMENT.
Licensed under a GNU GPL 2.0-style license, please see LICENSE.txt or contact permission@sei.cmu.edu for full terms.
[DISTRIBUTION STATEMENT A] This material has been approved for public release and unlimited distribution. Please see Copyright notice for non-US Government use and distribution.
This Software includes and/or makes use of Third-Party Software each subject to its own license.
DM25-0915
SiLK, the System for Internet-Level Knowledge, is a collection of traffic analysis tools developed by the CERT Network Situational Awareness Team (CERT NetSA) to facilitate security analysis of large networks. The SiLK tool suite supports the efficient collection, storage, and analysis of network flow data, enabling network security analysts to rapidly query large historical traffic data sets. SiLK is ideally suited for analyzing traffic on the backbone or border of a large, distributed enterprise or mid-sized ISP.
SiLK supports the collection of the following types of flow data:
Flows generated by a router producing NetFlow v5, or software that can generate data with that format. The format of NetFlow v5 PDUs (Protocol Data Units) is described in “NetFlow Export Datagram Format,” http://www.cisco.com/en/US/docs/net_mgmt/netflow_collection_engine/3.6/user/guide/format.html.
Internet Protocol Flow Information eXport flow records that were generated by an IPFIX-compliant flow generator such as YAF. To use this functionality, you must install libfixbuf-1.7.0 or later prior to building and installing SiLK. Both YAF and libfixbuf are available from https://tools.netsa.cert.org/. For information on IPFIX, see http://www.ietf.org/dyn/wg/charter/ipfix-charter.html.
Flows generated by a router producing NetFlow v9. To use this functionality, you must install libfixbuf-1.7.0 or later prior to building and installing SiLK.
Flows generated by an sFlow producer. To use this functionality, you must install libfixbuf-1.7.0 or later prior to building and installing SiLK.
This handbook provides instructions to configure and install the SiLK Collection and Analysis Suite. It is intended for individuals comfortable with the following tasks:
UNIX file system basics, including the basics of modifying shell scripts
Compilation of C code in a UNIX-like environment
Additionally, if SiLK will be accepting NetFlow data from a router, the installer should be comfortable with router configuration.
In order to build SiLK, you will need to have:
a C compiler, such as gcc
the make program
To get the full functionality of SiLK, these additional libraries and their header files are recommended:
Python 2.4 or later (including Python 3.x) for PySiLK, a module which supports using Python from within some SiLK tools and allows manipulating SiLK Flows from within Python (Python 2.6 or later is highly recommended)
libfixbuf-1.7.0 or later to support the collection of IPFIX data, NetFlow v9 data, and sFlow ( https://tools.netsa.cert.org/fixbuf/)
zlib general purpose compression library to support file compression and reading of compressed files
LZO real-time compression library to support file compression ( http://www.oberhumer.com/opensource/lzo/)
Snappy compression library to support file compression (http://google.github.io/snappy/)
libpcap to support conversion of packet capture data to SiLK Flows
GnuTLS library 2.12.0 or later (including GnuTLS 3.x) to support file transfer encryption between remote data collectors and the rest of SiLK (http://www.gnutls.org/)
libmaxminddb library 1.2.0 or later to allow rwgeoip2ccmap to create a country-code prefix map file from a MaxMind GeoIP21 or GeoLite2 binary database file (e.g., GeoIP2-Country.mmdb). (SiLK is able to read the GeoIP2 CSV files without requiring an additional library).
libipa 0.5.0 or later to support importing and exporting IP lists between SiLK and an IPA (IP Association) database (https://tools.netsa.cert.org/ipa/)
Note that many Linux systems have one package for the run-time shared libraries and another for the header files, and both must be installed when building SiLK from source. For example, to build SiLK with zlib support on a Red Hat Enterprise Linux AS release 4 system, you will need to install both the zlib-1.2.1.2-1.2 and the zlib-devel-1.2.1.2-1.2 RPMs (your version numbers may be different).
When building on a Linux system, the following packages are recommended:
c-ares (or libc-ares)
c-ares-devel (or libc-ares-devel)
glib2 (required when using libfixbuf or libipa)
glib2-devel
gnutls (required for encrypted flow collection transport)
gnutls-devel
libmaxminddb
libmaxminddb-devel
libssl-devel (required by Ubuntu’s python-devel package)
lzo
lzo-devel
pcap
pcap-devel
python
python-devel
snappy
snappy-devel
zlib
zlib-devel
New releases of SiLK are always capable of reading SiLK Flow data files created by previous releases of SiLK, and support for nearly all other SiLK file formats is maintained in newer releases. When upgrading to a new release of SiLK in an enterprise that uses separate collection, packing, and analysis machines, you should upgrade the analysis host(s) first, then the packing host(s), and finally the collectors. You may also choose to only upgrade the analysis hosts, and leave the packing and collection hosts at previous releases.
In addition, note that any change to the SiLK file formats will only occur when a change is made to the major or minor version numbers of SiLK (the SiLK version number follows the pattern major.minor.revision). Practically, this means that you can upgrade a collection machine to a newer release, say SiLK-0.13.9, and yet maintain the packing machines at an older release, SiLK-0.13.2. (These version numbers are for illustrative purposes only.) However, a bump in the minor version number does not always signal a change to the SiLK file formats. An analysis host at SiLK-0.13.2 may be able to read files created by SiLK-0.14.1 on the packing host; it depends on whether the SiLK file formats changed at SiLK-0.14.0. Changes to the SiLK file formats are always documented in the release notes, which are included in the source distribution and are available on the web site (https://tools.netsa.cert.org/silk/).
There are two categories of applications that comprise a SiLK installation:
read binary files containing SiLK Flow records and partition, sort, and count these records. Additional analysis tools can take packet capture (pcap) data, such as that created by tcpdump, and create SiLK Flow records from this data.
run as daemons to collect flow records from a flow generator (e.g., a router producing NetFlow), convert the records to the SiLK Flow format, categorize the flows as incoming or outgoing, and write the records to their final destination in binary flat files for use by the analysis tools.
Installation of the analysis tools is relatively straightforward since they are installed on systems that have direct access to the SiLK data files and require little configuration.
Installing the packing tools is more complex: the tools run as background processes (with every operating system having a unique way to start these processes) that must cooperate with each other and with additional software and/or network devices. The packing tools are designed to provide a great amount of flexibility in their installation, and with this flexibility comes additional complexity. The tools that make up the SiLK packing system are:
is the heart of the packing system. It reads flow data either directly from network devices producing flow data (flow generators) or from a file generated by flowcap, converts the data to the SiLK flow format, categorizes the flow records, and writes records either to hourly flat-files organized in a time-based directory structure or to small files for transfer to a remote machine for processing by rwflowappend. All installations of the packing system will run rwflowpack.
allows for remote data collection. It listens to flow generators and stores the data in small files (called flowcap files) in a single directory. These files are then transferred to rwflowpack for categorization and storage.
allows for remote data storage. It watches a directory for files containing small numbers of SiLK Flow records (called incremental files) and appends those records to hourly files organized in a time-based directory tree.
watches an incoming directory for files, moves the files to a processing directory, and transfers the files to one or more rwreceiver processes. rwsender’s incoming directory is usually the output directory of flowcap or rwflowpack.
accepts files transferred from one or more rwsender processes and stores them in a destination directory. It is this destination directory that rwflowpack or rwflowappend monitor for new files. Note that either rwsender or rwreceiver may act as the server process with the other acting as the client.
There are several possible configurations of the SiLK system which are introduced in this chapter. The detailed installation instructions are presented in subsequent chapters. In the subsections that follow, the term “remote” is with respect to the machine where rwflowpack is running.
In the single machine (all-in-one) configuration, all processing occurs on a single machine: You configure the rwflowpack program to collect flows, convert them to the SiLK Flow format, categorize them, and store the SiLK Flow records to the local disk. The analysis tools are installed on this same machine and read the files from local disk. Figure 1.1 shows how this configuration would look when flows are collected from a NetFlow router, and Figure 1.2 shows this configuration when the YAF flow collector is used.
This is the simplest complete installation. To use it, follow the instructions in Section 2 to configure and build the source code, Section 3 to customize the analysis tools, and Section 4 to configure rwflowpack.
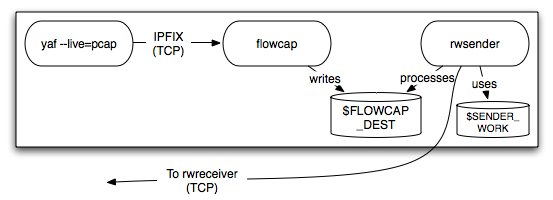
It is not uncommon to have a situation in which the sensor(s) generating the flow records are not close to the data storage location. You could configure the flow generators to send the data to the data storage location; however, due to network reliability and bandwidth issues, it is desirable to collect flow data as close to where it is produced as possible. (This is especially true if the flow generator uses an unreliable transport protocol, such as UDP-based NetFlow generated by a router.) In these situations, the flowcap daemon can be installed on a machine close to the sensor where it will collect, compress, and forward the data to rwflowpack for packing.
Also, suppose the machine where rwflowpack is running is not the same machine on which you are storing the SiLK Flow files, or perhaps you want the SiLK files to be available on multiple machines for use by groups of analysts. In such cases, you configure rwflowpack to write the SiLK Flows into small files called incremental files, and these incremental files are distributed over the network to machine(s) where the rwflowappend daemon writes the SiLK Flow records to their final location. The analysis tools read the records from this final location.
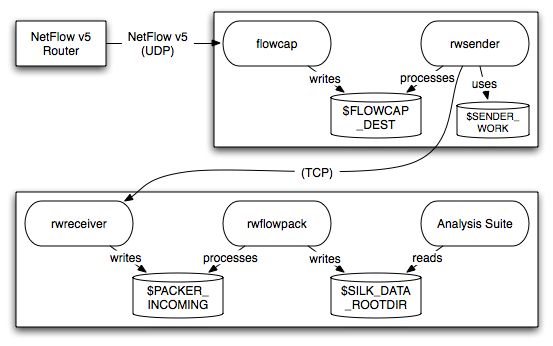
This configuration is the most complex and it is illustrated in Figure 1.3 collecting NetFlow. When the YAF flow collector is used, the top third of the drawing would resemble Figure 1.4.
In this configuration, the rwsender and rwreceiver daemons transfer files between the machines. rwsender monitors a directory and transfers the files it finds there to one or more rwreceivers on the downstream side. rwreceiver accepts files from one or more rwsenders and places the files into a directory where the next tool in the packing chain can process them.
rwsender and rwreceiver only transfer files; they do not consider the contents of the files. Instead of using rwsender and rwreceiver, you could (with some stipulations) use other software, such as rsync or scp, to transfer the files between the machines.
If this describes your installation, follow the instructions in Section 2 to install SiLK on each machine, in Section 3 to customize the analysis tools on each machine where analysis occurs, and in Section 5 to configure the daemons on all the machines where the packing tools run.
This configuration is a subset of the previous one: flowcap is used to capture the flows near the point where they are generated, and the rwsender and rwreceiver daemons transfer the flows to the machine where rwflowpack packs them and the analysis tools process them. Figure 1.5 depicts this configuration with a NetFlow router. When a YAF sensor is used, the top half of the figure would be replaced with Figure 1.4.
This installation will largely follow the same instructions as those described previously; however, the configuration of rwflowpack is slightly different as described in Section 6. That section will refer you to the parts of Section 5 you must follow to configure flowcap. You will use Section 3 to configure the the analysis tools on the machine where rwflowpack is installed.
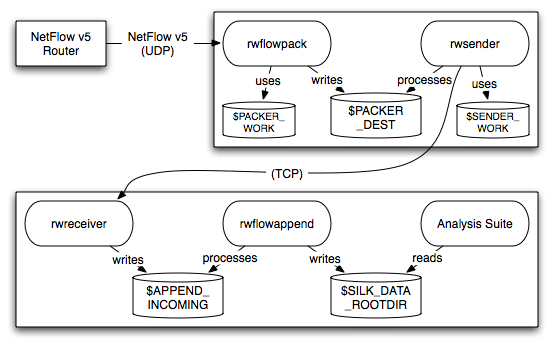
This configuration, shown in Figure 1.6, is also a subset of that described in Section 1.3.2, except that rwflowpack is used to collect the flows instead of flowcap.
For this configuration, you will install the source code on the packing machine and the analysis machine (Section 2), customize the analysis tools on the machine where rwflowappend is to run (Section 3), and configure rwflowpack and rwflowappend (Section 7).
Finally, if you only plan to use the software to analyze existing SiLK Flow files and/or packet capture (pcap) data such as that created by tcpdump, you would use this configuration (Figure 1.7). For this configuration, you need to build the source code (Section 2) and customize the analysis tools (Section 3).
The instructions in the next two sections of this handbook will allow you to use SiLK to analyze existing SiLK files and analyze packet capture (pcap) data such as that created by tcpdump: Section 2 describes how to configure and install the SiLK software from source, and Section 3 describes how to customize the analysis tools to get the most use from the system.
The other sections of the handbook describe how to use SiLK to capture flow data, categorize the flows as incoming or outgoing, convert the data to the SiLK format, and store the SiLK Flows in binary flat files indexed by hour, sensor, and direction: The simplest configuration is the Single machine configuration (Section 4), where one machine collects the flow records, packs them, and stores them locally for use by the analysis tools. Having collection, categorization, and storage on separate machines is the most complex configuration (Section 5), and other configurations are possible (Sections 6 and 7).
Section 8 describes how to configure the flow generator to send its data to the SiLK collector(s).
To assist you in the configuration process, Appendix 8.3 describes how SiLK categorizes flows as incoming or outgoing (including a description of the data storage hierarchy), and Appendix A.4 provides instructions on how to collect NetFlow data from the router and use that data as part of the configuration.
This handbook describes the installation of SiLK. For a discussion of the analysis tools, see their individual manual pages, the complete set of manual pages in The SiLK Reference Guide, and the tutorial information in Using SiLK for Network Traffic Analysis: Analysts’ Handbook. These documents are available at https://tools.netsa.cert.org/silk/docs.html.
In this section you will
unpack the SiLK source code
configure the software for your site by specifying switches to the configure shell script
build and install the software
$ gzip -d -c silk-3.24.0.tar.gz | tar xf -
$ cd silk-3.24.0
$ ./configure \
        --enable-data-rootdir=/data \
        --prefix=/usr/local
$ make
# make install
(You may need to become the root user to install the software.)
You may continue to Section 3.
Download and unpack the source code distribution:
$ gzip -d -c silk-3.24.0.tar.gz | tar xf -
For the remainder of these instructions, the full path to the top of the source tree (i.e., the silk-3.24.0 directory, which contains the configure file) will be referred to as $SUITEROOT; it may be set in your (Bourne-compatible) shell by entering the command:
$ export SUITEROOT=/home/silk/silk-3.24.0
You should decide where to install the tools and where your SiLK Flow data files will reside, and specify this information to the configure script. Some of these locations are compiled into the code, and others are used to initialize the start-up scripts and configuration files for rwflowpack and the other packing tool daemons.
The root of the directory tree where the SiLK Flow files are permanently stored. Use the --enable-data-rootdir=dir switch to give the value to configure. If you do not specify a location, /data is the name of the directory.
This value will be compiled into the analysis tools, and it will be the default location that rwfilter uses when looking for the hourly data files. This directory must be accessible by the final program in the packing chain (typically rwflowpack) which writes the packed SiLK flow files and by the analysis machine(s) which reads them. The path to the directory tree can be different on the analysis and packing machines, as long as the actual physical location is the same.
When running the tools, the value of the SILK_DATA_ROOTDIR environment variable will override this compiled-in value. In addition, rwfilter allows you to override this value with the --data-rootdir switch.
For historical reasons, the default value for this location is /data. We use a separate disk for the SiLK flow data since the space it requires can be large and depends on the size of the monitored network, the amount of traffic the network sees, and the aging policy for historical data.
The root of the directory tree where SiLK will be installed. Pass this value to configure in the --prefix switch. If not specified, the default is /usr/local. If you decide to move the tools after they have been installed, you may need to specify the LD_LIBRARY_PATH environment variable (or something equivalent for your platform) so that the applications can find the shared libraries.
The following table shows the subdirectories of $SILK_PATH where files are normally installed, but you can change these by specifying switches to configure. Use configure’s --help switch to see the full list of directory choices.
| bin | analysis tools, such as rwfilter |
| sbin | system administrator tools, for example rwflowpack |
| share/man | manual pages |
| lib/silk | optional plug-in support, such as PySiLK support |
| share/silk | support files, such as the country-code mapping file |
| share/silk/etc | sample configuration files and scripts to assist the system administrator in running the packing system daemons |
| etc | configuration files used by the packing system daemons (see SCRIPT_CONFIG_LOCATION below) |
| var | directory root used by packing tools (see DAEMON_STATE_DIRECTORY below) |
| var/log | log files generated by the packing system daemons |
| var/lib | incomplete data files generated by the packing tools and files awaiting processing |
| lib | libraries required to run the tools and used to build end-user plug-ins |
| include/silk | header files used to build end-user plug-ins |
Note: The applications work best when they have access to configuration files and plug-ins, and the code that searches for these files depend on the directory tree as it will be upon installation. If you do not plan to use the tools outside of your own tree, you may want to specify
--prefix=‘pwd‘(note the back quotes) to the configure script. When you run make install, the tools will be installed into the top of the source tree.
The directory containing configuration files used by the daemons that make up the SiLK packing system. Often this is the /etc directory for system daemons; RedHat Linux uses /etc/sysconfig for this value. The value SiLK uses is determined by the --sysconfdir switch to configure, and it defaults to $SILK_PATH/etc if the --sysconfdir switch was not given. This value will be written into the sample daemon control sh-scripts that get installed in $SILK_PATH/share/silk/etc/init.d/daemon . If you need to change this value after you run configure, you may simply change the value in the sh-scripts.
The directory used by the packing system daemons to store log files, incomplete data files, files received from remote machines, and files awaiting transfer. This is usually the /var directory, with subdirectories for the various types of files and applications that own them. You may set this value by running configure with --localstatedir=dir ; the default value for this directory is $SILK_PATH/var. This value is used in the configuration files for the packing tools that get installed in $SILK_PATH/share/silk/etc/daemon.conf. You will need to edit these files when you set up the packing system, and you do not have to use these initial values.
To adapt the source code to your operating system and environment, the configure shell script will run several tests to check for various features. By giving command line switches to configure, you can include additional features or instruct configure to use libraries from particular locations. You can also control where SiLK will be installed. You can display the full list of switches that configure accepts by running configure --help. The remainder of this section describes many of these switches.
SiLK provides support for accessing SiLK flow records from within Python and for using Python code as part of an rwfilter invocation. You may also use Python code to create arbitrary fields to use in rwcut, rwgroup, rwsort, rwstats, and rwuniq. This support is called PySiLK and it requires Python 2.4 or later. Python 2.6 or later is highly recommended, and PySiLK is known to work with Python 3.x. For information on using PySiLK, see SiLK in Python, available from https://tools.netsa.cert.org/silk/docs.html. You may also consult the manual pages for pysilk, silkpython, and the various applications.
To include PySiLK support, you must provide the --with-python switch to configure. To use a particular Python interpreter, you may use --with-python=path .
By default, the PySiLK modules will be installed into Python’s standard location for third-party modules. (Writing to this location usually requires that you are a system administrator.) To install the modules in the SiLK installation tree ($SILK_PATH), specify --with-python-prefix when running configure. You may also use --with-python-prefix=path to specify a different install prefix, or --with-python-site-dir=path to specify an explicit directory.
If the PySiLK module is installed outside of Python’s standard search locations, you will need to set or modify the PYTHONPATH environment variable to allow Python to find the PySiLK module.
There are two independent forms of IPv6 support in SiLK: Whether SiLK stores flow records containing IPv6 addresses, and whether SiLK supports IPv6 addresses for network connections.
Many SiLK applications support collecting, storing, and querying flow records that contain IPv6 addresses. Because of the overhead of storing IPv6 addresses, this capability is disabled by default. To enable this behavior, specify the --enable-ipv6 switch on the configure command line. If you want SiLK to be able to collect IPv6 flow records, you must include support for libfixbuf (see 2.3.7) which allows SiLK to collect IPFIX and NetFlow v9 data.
The SiLK applications that listen or connect to network sockets will support the use of IPv6 addresses when the operating system has IPv6 support (specifically, when the getaddrinfo() library call exists). To explicitly disable IPv6 networking support, specify --disable-inet6-networking on the configure command line.
This section describes a feature to make the default output of IPsets more compact at the risk of reducing compatibility with older releases of SiLK.
SiLK-3.0.0 added a new record version format that rwset, rwsettool, and the other IPset tools use when writing IPset files to a file or to a stream. That record version is 31 and it supports both IPv4 and IPv6 IPsets.
(By default, SiLK-3.0.0 used record version 3 for IPv4 IPsets, but in SiLK-3.6.0 the default for IPv4 IPsets was changed back to record version 2 since it is more compact. Record-version 2 is compatible with all releases of SiLK but it only supports IPv4.)
Since the SiLK-3.0.0 release, two additional IPset file formats have been added:
Record version 4 was added in SiLK-3.7.0. It supports both IPv4 and IPv6 IPsets. It is always more compact than record version 3 and often more compact that record version 2.
Record version 5 was added in SiLK-3.14.0, and it is only used when writing IPv6 IPsets. It is often more compact than record version 4.
Since it is our policy to avoid introducing incompatible changes within a major release series (such as the SiLK-3.x series), new releases of SiLK still default to using record version 3 when writing IPv6 IPsets. Users may choose a different record version via the SILK_IPSET_RECORD_VERSION environment variable and a tool’s --record-version switch.
The configure switch --enable-ipset-compatibility may be used to change the default record version written
by the IPset tools. The argument to the switch is a SiLK release number, such as 3.4.5. The switch accepts any
release number, and the IPset record versions for IPv4 IPsets and IPv6 IPsets are selected by determining into
which of the following ranges the release number falls:
| Min release | Max release | IPv4 IPset | IPv6 IPset |
| 3.14.0 | 999.999.999 | 4 | 5 |
| 3.7.0 | 3.13.999 | 4 | 4 |
| 0.0.0 | 3.6.999 | 2 | 3 |
This switch only changes the record version that rwset and the other IPset tools write by default. Users are still able to tell the tools to write files using the other record versions by setting the SILK_IPSET_RECORD_VERSION environment variable or using the tool’s --record-version switch.
SiLK uses the behavior introduced in SiLK-3.6.0 when the --enable-ipset-compatibility switch is not given to configure or when the switch is given but the argument is either illegal or missing.
To reduce the size of the data files, the rwflowpack daemon and many analysis tools have the ability to use an external library to automatically compress their binary output when writing and uncompress their input when reading. (This compression occurs on the ‘data’ section of the file; the file’s header remains uncompressed.) You can specify whether a particular tool uses this external compression via a switch on the tool’s command line. The default setting for this behavior is determined by the --enable-output-compression=type switch to configure. SiLK supports the following parameters to the switch:
| none | use no compression; this is the default |
| zlib | use the widely available zlib general compression library |
| snappy | use the Snappy data compression library |
| lzo1x | use the lzo1x algorithm from the LZO real-time data compression library |
Compression support requires the presence of external libraries as described in the next section.
If you specify --enable-output-compression with no type, the compression will default to the first available method of lzo1x, snappy, zlib, or none.
The configure script automatically attempts to find the compression libraries and each library’s header files. If the libray and header are found, support for that compression method is compiled into SiLK. You may use switches on the configure script to help it find the compression libraries.
Note: Several operating system vendors distribute the libraries and header files in separate packages. To take zlib on RedHat as an example, the zlib package contains the zlib library, and the header file (and manual page) is in the separate zlib-devel package. In order to build SiLK from source, you need to have both packages installed.
The --with-zlib=dir switch tells configure that the zlib general compression header and library are located in dir/include/zlib.h and dir/lib/libz.so, respectively.
The --with-snappy=dir switch tells configure that the Snappy (http://google.github.io/snappy/) data compression header and library are located in dir/include/snappy-c.h and dir/lib/libsnappy.so, respectively. SiLK has been tested with Snappy 1.1.1 and Snappy 1.1.3.
The --with-lzo=dir switch specifies the location of the LZO (http://www.oberhumer.com/opensource/lzo/) real-time data compression library. The configure script checks for several variations of the name of the header and library files: For the header, configure checks dir/include/lzo2/lzo1x.h, dir/include/lzo/lzo1x.h, and dir/include/lzo1x.h; for the library, configure checks dir/lib/lzo2.so and dir/lib/lzo.so. SiLK has been tested with LZO 1.08 and with LZO 2.02 through LZO 2.09.
When SiLK is compiled with libmaxminddb support, the rwgeoip2ccmap tool is able to build the country-code prefix map file (cf. Section 3.3) by reading a MaxMind GeoIP2 or GeoLite2 binary database file (e.g., GeoIP2-Country.mmdb).
SiLK (as of SiLK-3.17.0) is capable of reading the GeoIP2 and GeoLite2 comma-separated value (CSV) files without using an external library. If GeoIP2 binary support is not needed, the libmaxminddb library is not needed.
The configure script will look for the pkg-config(1) specification file for libmaxminddb v1.2.0 or later (libmaxminddb.pc) in the standard pkg-config directories, and if libmaxminddb is installed in a standard location, configure should be able to locate it. If you have installed libmaxminddb but configure does not find it, you may run configure with the --with-libmaxminddb=dir switch to add the directory dir to pkg-config’s search path (configure will add dir to the PKG_CONFIG_PATH environment variable). The libmaxminddb.pc file is normally installed in the lib/pkgconfig subdirectory of the location where libmaxminddb was installed.
When SiLK is compiled with libfixbuf support, the SiLK packer can read NetFlow v9 flow records, sFlow records (as of SiLK-3.9.0), and flow data generated by an IPFIX (Internet Protocol Flow Information eXport) compliant flow generator such as the YAF flow sensor technology (https://tools.netsa.cert.org/yaf/).
libfixbuf is a separate library; it does not come as part of SiLK. You must download it from https://tools.netsa.cert.org/fixbuf/ and install it prior to installing SiLK. For IPFIX, NetFlow v9, and sFlow support, SiLK requires libfixbuf-1.7.0 or later (starting with the SiLK-3.15.0 release). (To use libfixbuf-3.0 or later, SiLK-3.19.2 or later is required.)
If configure finds libfixbuf, the rwipfix2silk and rwsilk2ipfix command line tools will also be built. These tools support converting between the SiLK Flow record format and IPFIX.
The configure script will look for the pkg-config(1) specification file for libfixbuf (libfixbuf.pc) in the standard pkg-config directories, and if libfixbuf is installed in a standard location, configure should be able to locate it. If you have installed libfixbuf but configure does not find it, you can run configure with the --with-libfixbuf=dir switch to add the directory dir to pkg-config’s search path (configure will add dir to the PKG_CONFIG_PATH environment variable). The libfixbuf.pc file is normally installed in the lib/pkgconfig subdirectory of the location where libfixbuf was installed.
The packing logic used by rwflowpack to categorize flow records as incoming or outgoing, web or non-web, et cetera, is determined by a plug-in that is loaded when rwflowpack is invoked. The name of this plug-in must be passed to rwflowpack via the --packing-logic switch.
Using a plug-in for flow categorization makes it easier to change the packing logic or to test new categorization schemes. However, it requires that the plug-in be available and that you not have disabled plug-in support by building statically-linked applications (Section 2.3.11).
If you wish to compile the packing-logic into rwflowpack, you must specify the --enable-packing-logic switch when you run configure. The argument to this switch is the C source file containing the packing logic to use for this SiLK installation. If the argument is not a complete path, configure attempts to find the source file relative to the current directory and then (when building outside the source directory) relative to the top of the source tree. For example, if you wish to use the twoway packing logic described in Appendix 8.3, run
$ configure ... \
    --enable-packing-logic=site/twoway/packlogic-twoway.c
All of the SiLK applications (i.e., both the analysis tools and the packing [flow collection and storage] daemons) and their associated manual pages will be built and installed unless the --disable-packing-tools or --disable-analysis-tools switches are passed to configure. You can speed the building of the software if you disable the parts of the system you do not require. For example, a remote collection machine does not need the analysis tools (though they can be useful to have for debugging).
As of SiLK-3.10.0, static libraries (e.g., libsilk.a) are no longer built by default. To build static libraries, include the --enable-static switch on the configure command line.
The configure script will build SiLK with support for dynamic-linking, where the common library functions of SiLK are maintained in separate files that the operating system automatically loads when you invoke an application. (The alternative is called static-linking.) While dynamic-linking allows the kernel to maintain one image of the library for simultaneous invocations of SiLK tools, it makes moving the binaries almost impossible since the libraries must move as well, and often the binaries are configured to look in a particular location for the libraries.
If you wish to build without dynamic-linking support, give configure the --enable-static and --enable-static-applications switches, which builds the static libraries and forces the applications to be statically linked. However, this may result in some plug-ins not working correctly.
An alternative is to specify the --disable-shared switch to configure, but note that this results in the plug-ins not being compiled at all.
If you specify --enable-static-applications or --disable-shared to configure, you also need to specify the --enable-packing-logic switch since rwflowpack will not be able to load the packing logic as a plug-in. See Section 2.3.8 for a description of the --enable-packing-logic switch and the argument the switch requires.
If SiLK is compiled with GnuTLS support, the communication between rwsender and rwreceiver can be encrypted and authenticated once the appropriate certificates have been created and distributed. GnuTLS is the GNU Project’s Transport Layer Security Library, and it is available from http://www.gnutls.org/. Note that SiLK requires GnuTLS v2.12.0 or greater.
The configure script will look for the pkg-config(1) specification file for GnuTLS (gnutls.pc) in the standard pkg-config directories, and if GnuTLS is installed in a standard location, configure should be able to locate it. If you have installed GnuTLS but configure does not find it, you can run configure with the --with-gnutls=dir switch to add the directory dir to pkg-config’s search path (configure will add dir to the PKG_CONFIG_PATH environment variable). The gnutls.pc file is normally installed in the lib/pkgconfig subdirectory of the location where GnuTLS was installed.
By default, SiLK uses UTC when printing timestamps to the user, and it expects timestamps from the user to be in UTC. Giving configure the --enable-localtime switch will modify SiLK to print and expect times in the local timezone. (Data files are always indexed by UTC.)
The configure script will attempt to locate the pcap library and header files. If they are not found or if they do not have the required functions, SiLK will be built without support for the packet-flow conversion tools rwptoflow and rwpmatch.
If you wish to specify that SiLK use a particular version of the pcap library, pass the --with-pcap=dir switch to configure, where dir contains include/pcap.h and lib/libpcap.a (or a shared version of the library).
The rwresolve tool reads textual input and converts IP addresses to host names. The IP to host name mapping uses DNS, and these requests can be slow. There are two libraries that enable asynchronous DNS requests which rwresolve can take advantage of when support for the libraries is compiled into rwresolve. The configure script will attempt to locate both of these libraries (and their header files). If one or both libraries are found, rwresolve will be built with support for the library. Use the --resolver switch on rwresolve to choose which resolver to use.
http://www.chiark.greenend.org.uk/~ian/adns/. Currently the ADNS library does not support for IPv6 addresses. If you wish to use a particular version of the ADNS library, pass the --with-adns=dir switch to configure, where dir contains include/adns.h and lib/libadns.a (or a shared version of the library).
http://c-ares.haxx.se/. The c-ares library does support IPv6. To use a particular version of the c-ares library, pass the --with-c-ares=dir switch to configure, where dir contains include/ares.h and lib/libcares.a (or a shared version of the library).
If SiLK is compiled with libipa support, the rwipaimport and rwipaexport programs will be compiled. These tools interact with an IPA (IP Association) database, which stores information about IP addresses. rwipaimport takes an existing SiLK IPset, Bag, or Prefix Map and stores it in the database; rwipaexport reads data from the IPA database to create a SiLK IPset, Bag, or Prefix Map. libipa is a separate library available from https://tools.netsa.cert.org/ipa/. SiLK requires libipa-0.5.0 or greater.
The configure script will look for the pkg-config(1) specification file for libipa (libipa.pc) in the standard pkg-config directories, and if libipa is installed in a standard location, configure should be able to locate it. If you have installed libipa but configure does not find it, you can run configure with the --with-libipa=dir switch to add the directory dir to pkg-config’s search path (configure will add dir to the PKG_CONFIG_PATH environment variable). The libipa.pc file is normally installed in the lib/pkgconfig subdirectory of the location where libipa was installed.
By default, SiLK is built with full optimization (assuming the compiler accepts -O3 for optimization), with no debugging, and with assert()s disabled. Pass the --disable-optimization, --enable-debugging, and --enable-assert switches to configure to modify these settings. If your compiler uses a different switch to enable optimization (such as -x04 for Solaris’ cc), you may specify it with --enable-optimization=-x04.
You will need to configure the source code for each machine that runs any part of the SiLK Collection and Analysis Suite.
Run the configure script to configure the SiLK source code. The following command would configure the software to use /data as the location of the data repository and to expect to be installed into the /usr/local directory:
$ cd $SUITEROOT
$ ./configure \
        --prefix=/usr/local \
        --enable-data-rootdir=/data
Consult the previous section for additional switches that you may need or wish to pass to configure to help it find a library or to enable an optional feature.
configure will run several tests on your platform and use the results of these tests to create several files. When configure has finished, it will print a summary of how it has configured the SiLK source code:
* Configured package:           SiLK 3.24.0
* Host type:                    x86_64-unknown-linux-gnu
* Source files ($top_srcdir):   .
* Install directory:            /usr/local
* Root of packed data tree:     /data
* Packing logic:                via run-time plugin
* Timezone support:             UTC
* Default compression method:   SK_COMPMETHOD_NONE
* IPv6 network connections:     YES
* IPv6 flow record support:     YES
* IPset file compatibility:     SiLK 3.7.0 (record-version=4)
* IPFIX collection support:     YES (-pthread -L/lib64 -lfixbuf
    -lgthread-2.0 -lglib-2.0)
* NetFlow9 collection support:  YES
* sFlow collection support:     YES
* Fixbuf compatibility:         libfixbuf-1.7.1 >= 1.7.0
* Transport encryption support: YES (-lgnutls)
* IPA support:                  NO
* MaxMindDB support:            YES (-lmaxminddb)
* ZLIB support:                 YES (-lz)
* LZO support:                  YES (-L/usr/lib64 -llzo2)
* SNAPPY support:               YES (-lsnappy)
* LIBPCAP support:              YES (-lpcap)
* C-ARES support:               YES (-lcares)
* ADNS support:                 NO
* Python interpreter:           /usr/bin/python
* Python support:               YES (-Xlinker -export-dynamic -ldl
    -lutil -lm -L/usr/lib64 -lpython2.7 -pthread)
* Python package destination:   /usr/lib64/python2.7/site-packages
* Build analysis tools:         YES
* Build packing tools:          YES
* Compiler (CC):                gcc
* Compiler flags (CFLAGS):      -I$(srcdir) -I$(top_builddir)/src/include
    -I$(top_srcdir)/src/include -DNDEBUG -O3 -fno-strict-aliasing
    -Wall -W -Wmissing-prototypes -Wformat=2 -Wdeclaration-after-statement
    -Wpointer-arith
* Linker flags (LDFLAGS):
* Libraries (LIBS):             -lsnappy -llzo2 -lz -ldl -lm
The above message is also written to the silk-summary.txt file in the directory where you ran configure.
Verify that the configuration matches your expectations.
To build SiLK, simply type make from the top of the source tree:
$ cd $SUITEROOT
$ make
You can then install the software. Depending on where you chose to install, you may need to become the root user first. This command will install the applications, the support libraries, the plug-ins, and the manual pages:
# cd $SUITEROOT
# make install
As this chapter demonstrates, there are many configuration choices an administrator can make when creating a SiLK installation. Because of this, it is difficult for the SiLK authors to provide a single RPM that will work for every installation.
SiLK works around this by providing an RPM spec file template in the distribution (silk.spec.in). When you run the configure script, one of its output files is silk-3.24.0.spec, which is an RPM spec file that matches the configuration options you passed to configure.
To create the RPMs, you will largely follow the instructions provided in Sections 2.1 through 2.4 of this chapter. In Section 2.2, the only installation directory you need to choose is the SILK_DATA_ROOTDIR; that is, the root of the directory tree where the SiLK Flow files will be stored.
Once you have configured SiLK, you can use the RPM spec file (silk-3.24.0.spec), the SiLK distribution file (silk-3.24.0.tar.gz), and the rpmbuild utility to create RPMs that you can install.
The RPM spec file generates the following RPMs:
contains the libraries and configuration files required by the other parts of SiLK Toolset, as well as generally useful utilities. This package is a prerequisite for all other SiLK packages.
contains the analysis tools that query the SiLK Flow data collected by rwflowpack and summarize that data in various ways.
converts NetFlow v5, NetFlow v9, or IPFIX (Internet Protocol Flow Information eXport) data to the SiLK Flow record format, categorizes each flow (e.g., as incoming or outgoing), and stores the data in binary flat files within a directory tree, with one file per hour-category-sensor tuple. Use the tools from the silk-analysis package to query this data. rwflowpack may capture the data itself, or it may process files that have been created by flowcap.
contains flowcap, a daemon to capture NetFlow v5, NetFlow v9, or IPFIX flows, to store the data temporarily in files on its local disk, and to forward these files over the network to a machine where rwflowpack processes the data. flowcap is typically used with an rwsender–rwreceiver pair to move the files across the network.
is used when the final storage location of SiLK data files is on a different machine than that where the files are created by the rwflowpack daemon. rwflowappend watches a directory for SiLK data files and appends those files to the final storage location where the SiLK analysis tools from the silk-analysis package can process them. To move the files from rwflowpack to rwflowappend, an rwsender–rwreceiver pair is typically used.
contains a program (rwreceiver) which receives files over the network from one or more rwsender programs. rwsender–rwreceiver pairs are used to move files from a machine running flowcap to one running rwflowpack, or from the rwflowpack machine to machine(s) running rwflowappend.
contains a program (rwsender) which transmits files over the network to one or more rwreceiver programs.
contains a program (rwpollexec) which monitors a directory for incoming files. For each file, rwpollexec executes a user-specified command. If the command completes successfully, the file is either moved to an archive directory or deleted.
contains the development libraries and headers for SiLK. This package is required to build additional applications or to build shared libraries for use as plug-ins to the SiLK analysis tools.
This section describes the customization of the analysis tools. The manual page for each tool will be installed under $SILK_PATH/share/man/man1/ when you install SiLK. (In addition, https://tools.netsa.cert.org/silk/docs.html provides the manual pages as individual web pages and as a single volume in The SiLK Reference Guide. The web site also contains a tutorial on using the analysis suite: Using SiLK for Network Traffic Analysis: Analysts’ Handbook.)
While nothing in this section is required to use SiLK, these steps will enhance the utility of the software.
In addition to the information contained in the NetFlow or IPFIX flow record (e.g., source and destination addresses and ports, IP protocol, time stamps, data volume), every SiLK flow record has two additional pieces of information:
The sensor typically denotes the location where the flow data was collected; e.g., an organization that is instrumenting its border routers would create a sensor to represent each router.
The flowtype represents information about how the flow was routed (e.g., as incoming or outgoing) or other information about the flow (e.g., web or non-web). The packing process categorizes the flows into flowtypes. The class and type attributes on the SiLK flow records map to a flowtype.
The purpose of the SiLK site configuration file, silk.conf, is to define the sensors, classes, and types to use when packing and accessing the SiLK flow data. The first time you install SiLK, and any time you add new sensors (IPFIX or NetFlow generators) to a deployment, you will need to update silk.conf.
sensor 0 Alpha
sensor 1 Bravo
...

class all
    sensors Alpha Bravo ...
end class
Once you have made the changes, rename the file silk.conf and save it in the root of your data repository, normally /data.
You may continue to Section 3.2.
When you install SiLK, sample site configuration files are installed in $SILK_PATH/share/silk/SITE-silk.conf. The various files provide different sets of classes and types, and the site file must coordinate with the packing rules that you will use at your site. For information on the twoway and generic site files, see Appendix 8.3. We recommend use of the twoway-silk.conf file.
Copy twoway-silk.conf to a temporary location, renaming the file as silk.conf when you copy it, and open silk.conf in a text editor. If you are using the twoway-silk.conf file, you will see the following near the beginning of the file:
1sensor 0 S0
2sensor 1 S1
3sensor 2 S2
4sensor 3 S3
5...
6sensor 13 S13
7sensor 14 S14
8
9class all
10    sensors S0 S1 S2 S3 S4 S5 S6 S7 S8 S9 S10 S11 S12 S13 S14
11end class
Each line of form
sensor NUM NAME
defines a sensor, where
is an increasing integer number representing the integer ID of the sensor. It is good practice to number the first entry 0, the second 1, etc.
is the name of the sensor. For example, the name of the sensor on line 2 is S1. Each NAME can be up to 64 characters in length, and it may not contain an underscore, a slash, or white space.
As distributed, the twoway-silk.conf is configured with 15 sensors having names S0, S1, through S14. (If you have 15 or fewer sensors and these names are satisfactory, you may save the silk.conf file to the root of your data repository, typically /data, and skip ahead to Section 3.2.)
You may add, remove, or rename the sensors. Often the sensor names reflect the location of a router or the ISP the router connects to. There are some important things to keep in mind when modifying the list of sensors:
Once a sensor has been assigned an ID number and data has been collected for that sensor, future revisions should never remove or renumber the sensor. SiLK Flow files store the sensor’s integer ID and use it to look up the sensor’s name; removing or renumbering a sensor breaks this mapping. In order to keep the mapping consistent between new and old data, old sensor definitions should remain indefinitely.
If an existing sensor is ever renamed, it will be necessary to rename all the previously packed data files that have the former sensor name as part of their file names.
Once you have edited the sensor definitions, you must update the sensors command in the same file (line 10) to contain the list of sensor names.
For example, if you had three routers Alpha, Bravo, and Charlie you would edit the site configuration file to read:
sensor 0 Alpha
sensor 1 Bravo
sensor 2 Charlie

class all
    sensors Alpha Bravo Charlie
end class
You should not need to change the class and type statements in the file, and doing so may break the packing rules in use at your site.
Once you have modified the silk.conf file, you should copy it to the root of your data repository, typically /data (cf. Section 2.2).
A single installation of SiLK may be used to query multiple data storage locations (though each invocation of a command can only query one storage location). Install a silk.conf into the root of each data storage tree, and set the SILK_DATA_ROOTDIR environment variable to the root of the tree you wish to query.
The address type utility in SiLK provides a quick way to categorize an IPv4 address as internal to your network, external, or non-routable. The --stype and --dtype switches to rwfilter allow one to partition by this category, and the stype and dtype fields in rwcut, rwgroup, rwsort, rwstats, and rwuniq will display, group, sort, or count by this category. To use this functionality, you must create and install a mapping file the describes your IP space. If you do not wish to use this functionality (or if you wish to install it at a later time), you may skip to Section 3.3.
# My IP space (CMU)
128.2.0.0/16        internal
Save the text file, convert it into a binary prefix map, and copy it into the installation tree:
$ rwpmapbuild --input addresses.txt --output address_types.pmap
# cp address_types.pmap $SILK_PATH/share/silk/address_types.pmap
You may continue to Section 3.3.
The mapping file is named address_types.pmap, and you must build this file by creating a text file and processing it with the rwpmapbuild tool. A template for the text file is provided in $SILK_ROOT/share/silk/addrtype-templ.txt. The beginning of the file contains some setup information for rwpmapbuild:
1#    Numerical mappings of labels
2label 0             non-routable
3label 1             internal
4label 2             external
5
6#    Default to "external" for all un-defined ranges.
7default             external
8
9#    Force IP-based mode
10mode                ip
Note: Do not change the numerical values for the mappings (lines 2–4); the address type utility requires those particular values.
As distributed, the addrtype-templ.txt file contains CIDR blocks that should not be seen (are non-routable) on the public Internet. Each CIDR block is labeled as non-routable and is preceded with an explanatory comment:
0.0.0.0/8           non-routable
10.0.0.0/8          non-routable
127.0.0.0/8         non-routable
...
You may wish to make adjustments to this list depending on what you plan to instrument and where your sensors are located.
Copy the addrtype-templ.txt file to a new file, for example addresses.txt. Open addresses.txt in a text editor, add lines to the file describing your IP space (one CIDR block per line), and label each line internal; for example:
# My IP space (CMU)
128.2.0.0/16        internal
Any CIDR block that is not listed in the file will treated as an external address (due to the default rule on line 7).
Once you’ve created and saved the text file, convert it into a binary prefix map and copy it into the installation tree:
$ rwpmapbuild --input addresses.txt --output address_types.pmap
# cp address_types.pmap $SILK_PATH/share/silk/address_types.pmap
For additional information, see the addrtype(3) and rwpmapbuild(1) manual pages.
Some SiLK tools can use a data file to map IP addresses to the country where that IP is located. With the data file, named country_codes.pmap, in place, an analyst can use the scc and dcc switches (on rwfilter) and fields (on rwcut, rwgroup, rwsort, rwstats, and rwuniq) to partition, display, group, sort, and count by country. This section describes how to build and install the data file. If you do not wish to use this functionality (or if you wish to install it later), you may skip this section.
$ unzip GeoLite2-Country-CSV_20180327.zip
$ rwgeoip2ccmap --input-path=GeoLite2-Country-CSV_20180327 \
    --output-path=country_codes.pmap
# cp country_codes.pmap $SILK_PATH/share/silk/country_codes.pmap
SiLK supports creating the country_codes.pmap data from the following versions of the MaxMind GeoIP country data:
The GeoIP2 or GeoLite2 comma-separated value (CSV) files
The GeoIP2 or GeoLite2 binary database file when SiLK is built the libmaxminddb support (Section 2.3.6)
The GeoIP Legacy or GeoLite Legacy CSV file
The GeoIP Legacy or GeoLite Legacy binary file
For additional information, see the rwgeoip2ccmap(1) and ccfilter(3) manual pages.
This section describes how to configure your site to use a single machine to collect, pack, and analyze flow data as shown in Figures 1.1 and 1.2.
For this configuration, rwflowpack is used to collect, categorize, convert, and store the flow records on a single machine, and the analysis tools are installed on this same machine.
If this does not describe your packing configuration, refer to the list of possible configurations in Section 1.3.
This section provides instructions on creating the Sensor Configuration file used when collecting and categorizing the flow data. The Sensor Configuration file serves two purposes:
It instructs rwflowpack or flowcap on how to collect the data; for example, on which ports to listen for flow data.
It gives rwflowpack the information it needs to categorize the flow data.
You will find full documentation for the Sensor Configuration Language in the sensor.conf(5) manual page. This section serves as a starter guide.
This handbook will use sensor.conf as the name of the Sensor Configuration file, but it may have any reasonable name.
To meet the two purposes of the Sensor Configuration file, three types of objects are defined:
The probe block specifies collection information. The probe could be listening on the network for IPFIX or NetFlow records that are generated by a router or by software that processes packet capture (pcap) data. In rwflowpack, the probe may also specify directories that rwflowpack should periodically poll for files containing NetFlow v5 records, IPFIX records, or SiLK Flow records.
The sensor block specifies information used to categorize flow records. Each sensor block lists the names and types of probes that are used as a source for the sensor. The packed SiLK flow records will be labeled with the sensor’s numerical identifier.
The group block allows one to assign a name to a list of either CIDR blocks or non-negative integers to treat as SNMP interface values. A group may reference previously created groups. The use of groups is optional; their primary purpose is as a convenience to the administrator.
The SiLK collection tools support the following types of probes:
An ipfix probe may process Internet Protocol Flow Information eXport records that are read over the network from an IPFIX flow generator such as YAF (https://tools.netsa.cert.org/yaf/). Alternatively, an ipfix probe may poll a directory for files created by YAF. To support an ipfix probe, SiLK must be built with libfixbuf support (Section 2.3.7).
A netflow-v5 probe collects unidirectional NetFlow v5 Protocol Data Units (PDU) from a router or from software that generates NetFlow records from packet capture files. A netflow-v5 probe may also process files created by Cisco NetFlow Collector. These files contain one or more 1464 byte-blocks, where each block contains the 24-byte NetFlow v5 header and space for thirty 48-byte flow records (the header will say how many of the 30 records contain valid flow data). The format of a NetFlow v5 PDU is described in “NetFlow Export Datagram Format,” http://www.cisco.com/en/US/docs/net_mgmt/netflow_collection_engine/3.6/user/guide/format.html.
The netflow type is an alias for netflow-v5. This alias may be removed in a future release of SiLK.
A netflow-v9 probe collects NetFlow v9 records over the network. (Files of NetFlow v9 records are not supported.) To support a netflow-v9 probe, SiLK must be built with support for libfixbuf-1.7.0 or later (Section 2.3.7).
An sflow probe collects sFlow v5 records over the network. (Files of sFlow records are not supported.) To support an sflow probe, SiLK-3.9.0 or later is required and SiLK must be built with support for libfixbuf-1.7.0 or later (Section 2.3.7).
A silk probe processes the records contained in SiLK Flow files that were created by previous invocations of rwflowpack or of the SiLK analysis tools. The flows will be completely re-packed, as if they were just received over the network, and any categorization information in the records will be ignored. Since SiLK typically removes the SNMP interfaces from its flow records, it is unlikely that you will be able to use the SNMP interfaces to categorize the flows.
The syntax of the Sensor Configuration file allows simple key-value pairs on each line, where the key and value are separated by white space. Multiple values are separated by white space and/or comma. Blank lines and comments—which begin with ‘#’ and continue to the end of the line—are ignored.
The probe block assigns a name to the probe and specifies the type of probe. Each probe must have a unique name; since there is often a one-to-one mapping between probes and sensors, each probe usually has the same name as its sensor. Some sample probe blocks follow.
The following block defines the “Alpha” probe and it instructs rwflowpack or flowcap to listen on UDP port 18001 for NetFlow v5 PDUs:
probe Alpha netflow-v5
    listen-on-port 18001
    protocol udp
end probe
The “Bravo-ipfix” probe tells rwflowpack or flowcap to listen on 18002/tcp for IPFIX flows:
probe Bravo-ipfix ipfix
    listen-on-port 18002
    protocol tcp
end probe
In the next block, rwflowpack or flowcap will listen on UDP port 18003 for NetFlow v5 data. Connections from hosts other than 10.1.1.101 will be ignored.
probe Charlie netflow-v5
    listen-on-port 18003
    protocol udp
    accept-from-host 10.1.1.101
end probe
The “Delta-in” and “Delta-out” probes shown next can be used when the monitoring point sees unidirectional traffic. For example, when all incoming traffic enters the monitor on one network interface card (NIC) and all outgoing traffic enters the monitor on a different NIC. A separate collection process is used for each NIC, each sending to a different port (9902/tcp and 9907/tcp). The rwflowpack or flowcap program will bind to a particular host address (192.168.200.1).
probe Delta-in ipfix
    listen-on-port 9902
    listen-as-host 192.168.200.1
    protocol tcp
end probe
probe Delta-out ipfix
    listen-on-port 9907
    listen-as-host 192.168.200.1
    protocol tcp
end probe
The “Echo” and “Foxtrot” probes can be used by rwflowpack. These probes instruct rwflowpack to periodically poll the named directories for files containing NetFlow v5 PDUs. These directories are where the NetFlow Collector writes its data files.
probe Echo netflow-v5
    poll-directory /home/cisco/collector/echo
end probe
probe Foxtrot netflow-v5
    poll-directory /home/cisco/collector/foxtrot
end probe
When creating probes to collect IPFIX data that includes 802.1Q VLAN identifiers, SiLK can store these values (IPFIX’s vlanId and postVlanId fields) in the SiLK Flow record’s fields that typically hold the SNMP interfaces (input and output). In the sensor block, rwflowpack can use the values to discard certain flow records. The “Golf” and “Hotel” probes will extract and store the VLAN identifiers.
probe Golf ipfix
    interface-values vlan
    listen-on-port 9909
    protocol tcp
end probe
probe Hotel ipfix
    interface-values vlan
    poll-directory /home/ipfix/hotel
end probe
A group block gives a name to a list of either CIDR blocks or interface values. To reference an existing group, type an “at” character (@) followed by the name of the group. A group reference can be used in group blocks or in several statements in the sensor block as described in the next section. When using a group reference, the group must contain values consistent with the statement where the group is being used.
group One
    interfaces 2, 3
    interfaces 4
end group
group Two
    interfaces 5, @One
end group
group Three
    ipblocks 10.0.1.0/24, 10.0.3.0/24
    ipblocks 10.0.5.0/24
end group
group Four
    ipblocks 10.0.7.0/24, @Three
end group
The sensor block configures a sensor. The name of the sensor block must be the name of a sensor defined in the silk.conf site configuration file (cf. Section 3.1). The sensor block specifies which probes are associated with that sensor. Whenever flow data arrives on a probe, the sensor associated with the probe notices the data and processes it. The sensor’s processing of the flow data uses the other attributes defined in the sensor block to categorize the flows. Some examples are given here; for the details on how the packlogic-twoway.so plug-in uses this information, see Appendix 8.3.
The following sensor block instructs rwflowpack to categorize a flow from the “Alpha” probe as “incoming” when the incoming SNMP interface on the flow is 3 or 8. All other flows are considered outgoing. Flows processed by this rule are labeled as being from the “Alpha” sensor.
sensor Alpha
    netflow-v5-probes   Alpha
    external-interface  3,8
    internal-interface  remainder
end sensor
The following example is the same as the previous, but it uses the group “Alpha-external” to specify the external interfaces.
group Alpha-external
    interfaces 3,8
end group
sensor Alpha
    netflow-v5-probes   Alpha
    external-interface  @Alpha-external
    internal-interface  remainder
end sensor
The next block processes IPFIX flows collected by the “Bravo-ipfix” probe. If the source address is not in 192.168.12.0/24, the flow is considered incoming; otherwise, it is considered outgoing. These flows have “Bravo” as their sensor.
sensor Bravo
    ipfix-probes      Bravo-ipfix
    internal-ipblock  192.168.12.0/24
    external-ipblock  remainder
end sensor
The following example uses a group when creating the “Bravo” sensor.
group my-network
    ipblocks 192.168.12.0/24
end group
sensor Bravo
    ipfix-probes      Bravo-ipfix
    internal-ipblock  @my-network
    external-ipblock  remainder
end sensor
For the following sensor, rwflowpack categorizes a flow as incoming if its incoming SNMP interface is 7; an outgoing SNMP interface of 2 means the flow did not leave the router.
sensor Charlie
    netflow-v5-probes   Charlie
    external-interface  7
    null-interface      2
    internal-interface  remainder
end sensor
The data from the “Delta-in” and “Delta-out” probes above are merged into a single “Delta” sensor by creating two sensor blocks that each pack to the same sensor. All flows collected by “Delta-in” will be labeled as incoming; those collected by “Delta-out” as outgoing.
sensor Delta
    ipfix-probes         Delta-in
    source-network       external
    destination-network  internal
end sensor
sensor Delta
    ipfix-probes         Delta-out
    source-network       internal
    destination-network  external
end sensor
The following sensor packs flows collected by the “Echo” probe above, but it discards data that was blocked by the router—that is, traffic that went to the null interface will not be packed. The sensor definition assumes the null interface is 0 and the group “internet-nics” specifies the network cards on the router that face the Internet.
sensor Echo
    netflow-v5-probes    Echo
    discard-when         destination-interfaces 0
    external-interfaces  @internet-nics
    internal-interfaces  remainder
end sensor
When the same probe is specified in multiple sensors, each sensor has a chance to process the flows. Suppose “Fox” and “Trot” are two sensors whose address space is defined in the groups “fox-net” and “trot-net”, and suppose each sensor processes the data collected by the “Foxtrot” probe. Note that the “Fox” sensor will see data between “trot-net” and the Internet, and rwflowpack would normally pack that data at “Fox” as external-to-external (“ext2ext”) traffic since it does not involve “fox-net”; however, that may not be desirable. The following causes rwflowpack to discard data that is not associated with the appropriate address space.
sensor Fox
    netflow-v5-probes    Foxtrot
    discard-unless       any-ipblocks @fox-net
    internal-ipblocks    @fox-net
    external-ipblocks    remainder
end sensor
sensor Trot
    netflow-v5-probes    Foxtrot
    discard-unless       any-ipblocks @trot-net
    internal-ipblocks    @trot-net
    external-ipblocks    remainder
end sensor
The following example is similar to the previous in that multiple sensors get data from a single probe, except it discards traffic based on the VLAN identifiers that the “Golf” probe stored in the flow records. The first three sensors only pack traffic that match their specific VLAN identifier, while the “Golf-Extra” sensor will pack any traffic that was not stored in the other three sensors.
sensor Golf-Birdie
    ipfix-probes       Golf
    discard-unless     source-interfaces 1
    internal-ipblocks  @birdie-ips
    external-ipblocks  remainder
end sensor
sensor Golf-Eagle
    ipfix-probes       Golf
    discard-unless     source-interfaces 2
    internal-ipblocks  @eagle-ips
    external-ipblocks  remainder
end sensor
sensor Golf-Albatross
    ipfix-probes       Golf
    discard-unless     source-interfaces 3
    internal-ipblocks  @albatross-ips
    external-ipblocks  remainder
end sensor
sensor Golf-Extra
    ipfix-probes       Golf
    discard-when       source-interfaces 1 2 3
    internal-ipblocks  @birdie-ips @eagle-ips @albatross-ips
    external-ipblocks  remainder
end sensor
The following summarizes the most commonly used statements in the sensor.conf file. For the full syntax and additional examples, see the sensor.conf(5) manual page.
names the probe and specifies the type of data the probe should expect. The type of probe affects what other attributes are required.
tells the flow collector (rwflowpack or flowcap) the port number on which to listen for IPFIX, NetFlow v5, or NetFlow v9 data. The value should be one of the ports used when configuring YAF (Section 8.1) or the router (Section 8.2).
tells rwflowpack to query the named directory for files containing NetFlow v5 data, files created by YAF, or files containing SiLK flow records.
gives the IP protocol associated with the listen-on-port value, and it is required whenever listen-on-port is specified. NetFlow probes support the udp protocol, and IPFIX probes support tcp and udp.
expects a host address as its value, and it specifies the IP from which rwflowpack or flowcap will accept incoming flow records. When this attribute is not present, the daemon accepts packets from any host.
determines whether snmp or vlan values should be stored in the records read from probe. The default is snmp.
provides a way to name a list of CIDR blocks or a list of non-negative integers representing interface values. This name can be used in other group blocks and in various statements in the sensor block.
names the sensor for which data is being packed. The value must be a known sensor listed in the silk.conf file.
specifies the names and types of the probes to use as a data source for this sensor. This statement is required.
specifies the SNMP interfaces on the router that face NETWORK-NAME. The value to the statement must be a one or more non-negative integers and/or groups containing interface values. The keyword remainder can be used to signify all interfaces not listed on other interfaces. The remainder keyword can only appear once within a sensor block. The legal values of NETWORK-NAME are defined in the packing logic plug-in that rwflowpack loads. For the packlogic-twoway.so plug-in:
lists the interfaces where traffic is coming into the monitored network from the outside
lists the interfaces facing the monitored network
lists the interface your router uses for a flow record that did not leave the router, either because the flow was blocked by an ACL violation, or because the flow represented packets that were destined for the router itself (e.g., a routing protocol message)
specifies the IP space of NETWORK-NAME. Its value is a CIDR block, a group containing CIDR blocks, a comma separated list of CIDR blocks and/or groups, or the keyword remainder to specify all CIDR blocks not assigned to other ipblocks. The legal values of NETWORK-NAME are defined in the packing logic plug-in that rwflowpack loads. Taking the twoway packing logic as an example, internal-ipblocks lists the IP space of the monitored network.
takes a NETWORK-NAME as its argument. This statement specifies that all traffic seen by the associated probe(s) should be considered as coming from the named network. The legal network names are defined in the packing logic plug-in that rwflowpack loads.
takes a NETWORK-NAME as its argument. This statement specifies that all traffic seen by the associated probe(s) should be considered as going to the named network.
discards traffic when the record’s input field matches one of the values in the list of interfaces or groups containing interfaces.
discards traffic when the record’s input field does not match any of the values in the list of interfaces or groups containing interfaces.
discards traffic when the record’s output field matches one of the values in the list of interfaces or groups containing interfaces.
discards traffic when the record’s output field does not match any of the values in the list of interfaces or groups containing interfaces.
discards traffic when either the record’s input field or the record’s output field matches one of the values in the list of interfaces or groups containing interfaces.
discards traffic when neither the record’s input field nor the record’s output field matches any of the values in the list of interfaces or groups containing interfaces.
discards traffic when the record’s sIP matches one of the values in the list of CIDR blocks or groups containing CIDR blocks.
discards traffic when the record’s sIP does not match any of the values in the list of CIDR blocks or groups containing CIDR blocks.
discards traffic when the record’s dIP matches one of the values in the list of CIDR blocks or groups containing CIDR blocks.
discards traffic when the record’s dIP does not match any of the values in the list of CIDR blocks or groups containing CIDR blocks.
discards traffic when either the record’s sIP or the record’s dIP matches one of the values in the list of CIDR blocks or groups containing CIDR blocks.
discards traffic when neither the record’s sIP nor the record’s dIP matches any of the values in the list of CIDR blocks or groups containing CIDR blocks.
Choose locations and create the following directories if they do not exist:
The root of the directory tree where SiLK will be installed. Pass this value to the configure in the --prefix switch (cf. Section 2.2). If not specified, the default is /usr/local.
The root of the directory tree where the SiLK Flow files are permanently stored. This should correspond to the --enable-data-rootdir value that was passed to the configure script (see Section 2.2). If you do not pass that switch to configure, /data is the name of the directory.
The directory containing configuration files used by daemons. Often this is the /etc directory for system daemons; RedHat Linux uses /etc/sysconfig for this value. The value SiLK uses is determined by the --sysconfdir switch to configure, and it defaults to $SILK_PATH/etc if the --sysconfdir switch was not given. When you ran configure, the example sh-scripts described in the next section were modified to use this location.
An additional directory for configuration files; these files also may be used by daemons. We recommend using $SILK_PATH/etc/silk/ for this directory, though you may use $SILK_PATH/share/silk/ or the SCRIPT_CONFIG_LOCATION for this setting. There is no part of SiLK that requires this to be in a particular location.
The directory in which rwflowpack’s process identifier (PID) and log files are written.
Build and install the SiLK software as described in Sections 2 and 3. Be certain to customize silk.conf and install it in the SILK_DATA_ROOTDIR directory.
Follow the instructions in Section 4.1 to create the Sensor Configuration file, and copy the file into the CONFIG_FILE_DIR directory.
To provide easier control of the SiLK daemons in UNIX-like environments, example sh-scripts are provided. The names of these scripts are the same as the daemon they control. The scripts are installed in the $SILK_PATH/share/silk/etc/init.d/ directory, but you should copy them to the standard location for start-up scripts on your system (e.g., /etc/init.d/ on Linux and other SysV-type systems).
To generate the command line for the daemon named daemon , the control script checks settings in the text file SCRIPT_CONFIG_LOCATION/daemon.conf. Before using a control script, you must create a daemon.conf file and customize it for your environment.
For each daemon, an example configuration file is installed in the $SILK_PATH/share/silk/etc/ directory. You will need to copy the file to the SCRIPT_CONFIG_LOCATION directory and modify it as described in this section. (The format of these configuration files may change between releases of SiLK. When upgrading from a previous release, you should merge your previous settings into the new version of the configuration file.)
You should not need to edit any of the control scripts; however, be aware the value of SCRIPT_CONFIG_LOCATION they use was set when you ran configure.
Many of the variable names in rwflowpack.conf correspond to a command line switch on rwflowpack. By referencing the rwflowpack manual page and the documentation for each variable in that file, you should be able to determine how set each variable. This section highlights some of the settings. The switch that the variable controls follows each name.
(--sensor-configuration) This variable contains the full path to the Sensor Configuration file you created in Section 4.1 and copied into the CONFIG_FILE_DIR directory above.
(--packing-logic) This variable may be blank or it may contain the name of (or the path to) the plug-in that rwflowpack will load to get the “packing logic” it uses. The packing logic specifies how rwflowpack determines into which category each flow record is written (for example, whether a record is incoming or outgoing). The packing logic uses values from the SENSOR_CONFIG file. You may also specify the packing logic plug-in with the packing-logic statement in the silk.conf site configuration file. The PACKING_LOGIC value must be empty if SiLK was configured without support for the packing logic plug-in (cf. Section 2.3.8).
(--root-directory) This variable specifies the root directory for packed SiLK data files. Set this switch to the SILK_DATA_ROOTDIR value you chose above.
(--input-mode) This variable determines whether data is being read directly from the network or whether rwflowpack is processing files generated by flowcap. Verify that it says stream.
(--output-mode) This variable determines whether rwflowpack writes to the repository itself or relies on rwflowappend to write to the repository. Verify that it says local-storage.
Set this variable to any non-empty value. It is used by the control script to determine whether the administrator has completed the configuration.
When this value is yes, the control script creates any directories that the daemon requires but are nonexistent.
The daemons support writing their log messages to the syslog(3) facility or to local log files rotated at midnight local time. Set this to syslog to use syslog, or to legacy to use local log files.
When the LOG_TYPE is legacy, the logging files are written to this directory. Set this variable to the LOGGING_DIR value you chose above. The /var/log directory is often used for log files.
The daemons write their process identifier (PID) to a file in this directory. By default this variable has the same value as LOG_DIR, but you may wish to change it. On many systems, the /var/run directory holds this information.
The control script switches to this user (see su(1)) when starting the daemon. The default user is root. Note that all of SiLK can be run as an ordinary user.
Save the rwflowpack.conf file into the SCRIPT_CONFIG_LOCATION directory that you created above.
To test whether everything is correct, try starting rwflowpack using the control script:
$ sh $SILK_PATH/share/silk/etc/init.d/rwflowpack start
Starting rwflowpack:    [OK]
$
If rwflowpack fails to start, it prints an error message to the standard error. If everything is correct, rwflowpack writes a file named rwflowpack.pid into the PID_DIR directory, and log messages are written either to files in LOG_DIR or to your machine’s system log.
You can use the control script to stop rwflowpack:
$ sh $SILK_PATH/share/silk/etc/init.d/rwflowpack stop
Stopping rwflowpack:    WARNING sleeping for 10 seconds
[OK]
$
The log messages that rwflowpack generates (assuming no data was collected) will resemble:
Mar 26 19:04:31 sst rwflowpack[9933]: /usr/sbin/rwflowpack --pidfile=...
Mar 26 19:04:31 sst rwflowpack[9933]: Forked child 9935.  Parent exiting
Mar 26 19:04:31 sst rwflowpack[9935]: Creating stream cache
Mar 26 19:04:51 sst rwflowpack[9935]: Shutting down due to SIGINT signal
Mar 26 19:04:51 sst rwflowpack[9935]: Begin shutting down...
Mar 26 19:04:51 sst rwflowpack[9935]: Stopping processors
Mar 26 19:04:53 sst rwflowpack[9935]: Waiting for record handlers.
Mar 26 19:04:53 sst rwflowpack[9935]: Closing all files.
Mar 26 19:04:53 sst rwflowpack[9935]: Finished shutting down.
Mar 26 19:04:53 sst rwflowpack[9935]: Stopped logging.
If you wish, you can make rwflowpack start automatically when the machine boots by adding the rwflowpack control script to your machine’s boot sequence. The details vary among operating systems.
For RedHat Linux, issue the following commands:
# cp $SILK_PATH/share/silk/etc/init.d/rwflowpack /etc/init.d/rwflowpack
# chkconfig --add rwflowpack
At this point, you should be able to start the packer using the following command:
# service rwflowpack start
Follow the instructions in Section 8 to start the flow generator.
If rwflowpack is listening for NetFlow traffic on UDP port(s), follow the instructions in Section 8.3 to increase the maximum socket buffer size allowed by your kernel.
This section describes how to configure your site to use the packing configuration that supports remote data collection and remote SiLK Flow storage (see Figures 1.3 and 1.4).
For this configuration, there are three sets of machines:
One or more machines act as collection machines. Each collection machine runs the flowcap daemon to collect the flows and store them in “flowcap files”. The rwsender daemon also runs on each collection machine, and it transfers the files from the collection machine to the packing machine.
There is typically one machine, called the packing machine, that runs rwflowpack to read the files generated by flowcap, to convert the flow records they contain, to categorize flows, and to write “incremental files” containing small numbers of SiLK flow records. The packing machine runs an rwreceiver process to accept the files from the collection machines, and it runs the rwsender daemon to transfer the incremental files from the packing machine to each storage machine.
One or more storage machines run the rwreceiver daemon to receive the incremental files, and the rwflowappend daemon appends the incremental files to their final location in hourly files. In addition, each storage machine has the SiLK analysis tools installed to read and analyze the data in the hourly files.
If this does not describe your packing configuration, refer to the list of possible configurations in Section 1.3.
These instructions assume the rwreceiver and rwsender daemons on the packing machine always act as clients. That is, the rwsender on each collection machine runs in server mode as does the rwreceiver on each storage machine.
For an installation that uses remote data collection and SiLK Flow storage, you must build, install, and configure the software on the packing machine as well as on every collection machine and storage machine.
The packing machine runs three daemons:
rwreceiver receives flowcap files from the collection machines
rwflowpack converts and categorizes the flows it reads from the flowcap files and creates incremental files.
rwsender transfers the incremental files to the storage machines.
In this section you configure and build the software, and configure rwflowpack. The configuration of rwreceiver and rwsender occur in later sections (5.3 and 5.5, respectively).
Choose locations and create the following directories if they do not exist:
The root of the directory tree where SiLK will be installed. Pass this value to the configure in the --prefix switch (cf. Section 2.2). If not specified, the default is /usr/local.
The directory where rwreceiver deposits the flowcap files for processing by rwflowpack.
The directory where rwflowpack writes the incremental files for delivery to rwflowappend. rwsender polls this directory and accepts the files that it finds for delivery to the rwreceiver processes on the storage machines.
The directory where rwsender stores the files that it has accepted but not yet sent to the intended rwreceiver(s).
The directory where rwsender stores the files that are not accepted by rwreceiver.
The directory containing configuration files used by daemons. Often this is the /etc directory for system daemons; RedHat Linux uses /etc/sysconfig for this value. The value SiLK uses is determined by the --sysconfdir switch to configure, and it defaults to $SILK_PATH/etc if the --sysconfdir switch was not given. When you ran configure, the example sh-scripts described in the next section were modified to use this location.
An additional directory for configuration files; these files also may be used by daemons. We recommend using $SILK_PATH/etc/silk/ for this directory, though you may use $SILK_PATH/share/silk/ or the SCRIPT_CONFIG_LOCATION for this setting. There is no part of SiLK that requires this to be in a particular location.
The directory in which the process identifier (PID) and log files for rwflowpack, rwreceiver, and rwsender are written.
Build and install the SiLK software as described in Section 2. Since you will not be storing the SiLK flows on the packing machine, you may ignore the --enable-data-rootdir switch. For faster compilation and to save disk space, you can avoid building the analysis tools by passing the --disable-analysis-tools switch to configure.
Follow the instructions in Section 3.1 to customize the silk.conf file, and save it to $SILK_PATH/share/silk/silk.conf so rwflowpack will locate it. You can ignore the remainder of Section 3 on the packing machine.
Follow the instructions in Section 4.1 to create the Sensor Configuration file, and copy the file into the CONFIG_FILE_DIR directory.
rwflowpack runs on the packing machine to process files generated by flowcap and create incremental files for rwflowappend.
To provide easier control of the SiLK daemons in UNIX-like environments, example sh-scripts are provided. The names of these scripts are the same as the daemon they control. The scripts are installed in the $SILK_PATH/share/silk/etc/init.d/ directory, but you should copy them to the standard location for start-up scripts on your system (e.g., /etc/init.d/ on Linux and other SysV-type systems).
To generate the command line for the daemon named daemon , the control script checks settings in the text file SCRIPT_CONFIG_LOCATION/daemon.conf. Before using a control script, you must create a daemon.conf file and customize it for your environment.
For each daemon, an example configuration file is installed in the $SILK_PATH/share/silk/etc/ directory. You will need to copy the file to the SCRIPT_CONFIG_LOCATION directory and modify it as described in this section. (The format of these configuration files may change between releases of SiLK. When upgrading from a previous release, you should merge your previous settings into the new version of the configuration file.)
You should not need to edit any of the control scripts; however, be aware the value of SCRIPT_CONFIG_LOCATION they use was set when you ran configure.
Many of the variable names in rwflowpack.conf correspond to a command line switch on rwflowpack. By referencing the rwflowpack manual page and the documentation for each variable in that file, you should be able to determine how set each variable. This section highlights some of the settings. The switch that the variable controls follows each name.
(--sensor-configuration) This variable contains the full path to the Sensor Configuration file you created in Section 4.1 and copied into the CONFIG_FILE_DIR directory above.
(--packing-logic) This variable may be blank or it may contain the name of (or the path to) the plug-in that rwflowpack will load to get the “packing logic” it uses. The packing logic specifies how rwflowpack determines into which category each flow record is written (for example, whether a record is incoming or outgoing). The packing logic uses values from the SENSOR_CONFIG file. You may also specify the packing logic plug-in with the packing-logic statement in the silk.conf site configuration file. The PACKING_LOGIC value must be empty if SiLK was configured without support for the packing logic plug-in (cf. Section 2.3.8).
(--incoming-directory). This variable specifies where rwflowpack looks for flowcap files. Set this to the PACKER_INCOMING value you chose above.
(--archive-directory) If this variable is set, rwflowpack archives the flowcap files after it has processed them. Unset this variable to disable archiving, or enter the full path to your archive directory.
(--incremental-directory) This variable names the full path of the directory where rwflowpack writes the incremental files for processing by rwsender. Set this variable to the PACKER_DEST value you chose above. (Note: This configuration is valid for SiLK-3.6.0 and later; for older rwflowpacks, see that version’s Installation Handbook.)
(--input-mode) This variable determines whether data is being read directly from the network or whether rwflowpack is processing files generated by flowcap. Verify that it says fcfiles.
(--output-mode) This variable determines whether rwflowpack writes to the repository itself or relies on rwflowappend to write to the repository. Verify that it says sending.
The following settings are common across all daemon.conf files:
Set this variable to any non-empty value. It is used by the control script to determine whether the administrator has completed the configuration.
When this value is yes, the control script creates any directories that the daemon requires but are nonexistent.
The daemons support writing their log messages to the syslog(3) facility or to local log files rotated at midnight local time. Set this to syslog to use syslog, or to legacy to use local log files.
When the LOG_TYPE is legacy, the logging files are written to this directory. Set this variable to the LOGGING_DIR value you chose above. The /var/log directory is often used for log files.
The daemons write their process identifier (PID) to a file in this directory. By default this variable has the same value as LOG_DIR, but you may wish to change it. On many systems, the /var/run directory holds this information.
The control script switches to this user (see su(1)) when starting the daemon. The default user is root. Note that all of SiLK can be run as an ordinary user.
Save the rwflowpack.conf file into the SCRIPT_CONFIG_LOCATION directory that you created above.
To test whether the settings in rwflowpack.conf are correct, use the control script to start rwflowpack:
$ sh $SILK_PATH/share/silk/etc/init.d/rwflowpack start
Starting rwflowpack:    [OK]
$
If rwflowpack fails to start, it prints an error message to the standard error. If everything is correct, rwflowpack writes a file named rwflowpack.pid into the PID_DIR directory, and log messages are written either to files in LOG_DIR or to your machine’s system log.
You can stop rwflowpack while you configure the other parts of the system:
$ sh $SILK_PATH/share/silk/etc/init.d/rwflowpack stop
Stopping rwflowpack:    WARNING sleeping for 10 seconds
[OK]
$
The log messages that rwflowpack generates will resemble:
Mar 26 17:38:48 sst rwflowpack[8965]: /usr/sbin/rwflowpack --pidfile=...
Mar 26 17:38:48 sst rwflowpack[8965]: Forked child 8967.  Parent exiting
Mar 26 17:38:48 sst rwflowpack[8967]: Creating stream cache
Mar 26 17:38:53 sst rwflowpack[8967]: Shutting down due to SIGINT signal
Mar 26 17:38:53 sst rwflowpack[8967]: Begin shutting down...
Mar 26 17:38:53 sst rwflowpack[8967]: Stopping processors
Mar 26 17:38:55 sst rwflowpack[8967]: Waiting for record handlers.
Mar 26 17:38:55 sst rwflowpack[8967]: Closing all files.
Mar 26 17:38:55 sst rwflowpack[8967]: Finished shutting down.
Mar 26 17:38:55 sst rwflowpack[8967]: Stopped logging.
If you wish, you can make rwflowpack start automatically when the packing machine boots by adding the rwflowpack control script to its boot sequence. The details vary among operating systems.
For RedHat Linux, issue the following commands:
# cp $SILK_PATH/share/silk/etc/init.d/rwflowpack /etc/init.d/rwflowpack
# chkconfig --add rwflowpack
At this point, you should be able to start and stop the packer using the following commands:
# service rwflowpack start
# service rwflowpack stop
rwreceiver runs on the packing machine to accept, from the collection machine(s), the files generated by flowcap and sent by rwsender.
Each rwsender and rwreceiver is configured with an identifier of its own and the identifier(s) of the rwreceiver(s) or rwsender(s) that may connect to it. The connection will not be established if the identifier provided by other process is not recognized. In addition, every rwsender that communicates with the same rwreceiver must have a unique identifier; likewise, every rwreceiver that communicates with the same rwsender must have a unique identifier.
Create the identifier that the rwreceiver client on the packing machine sends when it contacts the
rwsender daemon running on each collection machine. The identifier should contain only printable,
non-whitespace characters; the following characters are illegal: colon (:), slash (/ and \), period (.), and
comma (,).
The identifier should reflect that this is the rwreceiver process associated with the packer. These instructions use rcv-packer1.
You will use this identifier when you set up the rwsender daemon on each collection machine in Section 5.2.3, and when you configure rwreceiver on the packing machine (Section 5.3).
rwsender runs on the packing machine to transfer the incremental files generated by rwflowpack to the rwreceiver and rwflowappend processes on the storage machines.
Create the identifier that the rwsender client on the packing machine sends when it contacts the
rwreceiver daemon running on each storage machine. The identifier should contain only printable,
non-whitespace characters; the following characters are illegal: colon (:), slash (/ and \), period (.), and
comma (,).
The identifier should reflect that this is the rwsender process associated with the packer. These instructions suggest you use send-packer1.
You will use this identifier when you set up the rwreceiver daemon on each storage machine in Section 5.4.3, and when you configure rwsender on the packing machine (Section 5.5).
If SiLK is compiled with GnuTLS support (see Section 2.3.12), rwsender and rwreceiver can communicate using a secure (encrypted and authenticated) layer over TCP. If SiLK was not compiled with GnuTLS support or you do not wish to use this feature, you may skip this section.
When the GnuTLS-specific options are specified, rwsender and rwreceiver use GnuTLS for all communications with other rwreceivers and rwsenders. The applications will not allow communication to an application that is not using GnuTLS. If you wish to use GnuTLS for some communication but not others, you will need to run multiple instances of rwsender and rwreceiver.
To use this feature, the rwsender and rwreceiver each need access to the PEM (Privacy Enhanced Mail) encoded root Certificate Authority (CA) file and either to a DER (Distinguished Encoding Rules) encoded PKCS#12 file or to a PEM encoded key and a PEM encoded certificate file. See Appendix A.4 for instructions on creating these files using the GnuTLS certtool program.
The communication between rwsender and rwreceiver will be established as long as the PKCS#12 file or the key and certificate files both have the same CA. You can create a single key and certificate and use that on for all instances of rwsender and rwreceiver, or create a separate certificate/key pair for each instance of these programs.
For simplicity, these instructions assume you will use a single PKCS#12 file, named pkcs12.der, for all communication between any rwsender and rwreceiver. In addition, the instructions use rootcert.pem for the name of the CA root certificate file. These files should be installed in the CONFIG_FILE_DIR directory on the packing machine.
In Section 4.1, you created the Sensor Configuration file listing all the sensors and probes in your network. The instructions that follow assume that every collection machine is associated with a unique sensor named SENSOR.
Each collection machine runs two daemons:
flowcap collects flows for SENSOR, compresses the flows, and stores them in a local directory.
rwsender transfers the files created by flowcap to the packing machine.
You will perform these steps on every machine where remote collection occurs.
Choose locations and create the following directories if they do not exist:
The root of the directory tree where SiLK will be installed. Pass this value to the configure in the --prefix switch (cf. Section 2.2). If not specified, the default is /usr/local.
The directory where flowcap writes the files it creates. rwsender polls this directory and accepts the files that it finds for delivery to the rwreceiver process running on the packing machine.
The directory where rwsender stores the files that it has accepted but not yet sent to the intended rwreceiver(s).
The directory where rwsender stores the files that are not accepted by rwreceiver.
The directory for configuration files used by daemons.
An additional directory for configuration files; these files also may be used by daemons.
The directory in which flowcap’s and rwsender’s process identifier (PID) and log files are written.
Build and install the SiLK software as described in Section 2. Since you will not be storing the SiLK flows on the collection machine, you may ignore the --enable-data-rootdir switch on this machine. For faster compilation and to save disk space, you can avoid building the analysis tools by passing the --disable-analysis-tools switch to configure.
Copy the silk.conf file from the packing machine to this machine. If you save it in $SILK_PATH/share/silk/silk.conf, flowcap will automatically find it.
Copy the Sensor Configuration file from the packing machine to this machine and save it in the CONFIG_FILE_DIR directory.
If you are using GnuTLS, copy the rootcert.pem and pkcs12.der files that you created on the packing machine in Section 5.1.5 into the CONFIG_FILE_DIR directory on this machine.
flowcap runs on the collection machine to capture flow records and store them in files for transfer to the packing machine.
The SCRIPT_CONFIG_LOCATION/flowcap.conf file is used by the control script to generate the command line for flowcap. An example flowcap.conf file is available in the $SILK_PATH/share/silk/etc/ directory. These are the variables in the flowcap.conf file you will need to change:
(--sensor-configuration) This variable contains the full path to the Sensor Configuration file you created in Section 4.1 and copied into the CONFIG_FILE_DIR directory above.
(--probes) This variable causes flowcap to collect data from a subset of the probes specified in the Sensor Configuration file. Assuming you have created a single Sensor Configuration file that you are sharing across all collection machines, you need to set this variable to the name(s) of the probe(s) used by SENSOR.
This variable determines whether flowcap relies on rwsender to deliver the files or acts as stand-alone server. Verify that it says local to use rwsender.
(--destination-directory) This variable contains the full path to the directory where flowcap deposits its files for collection by rwsender. Set this to the FLOWCAP_DEST value you specified above.
Check that the values for the maximum percentage of the disk to use (FULLSPACE_MAX) and the minimum amount of free space to leave (FREESPACE_MIN) make sense at your site. The values specified in the file as shipped assume a single disk partition is dedicated to storing the files generated by flowcap.
You will also need to change some of the following; they are the same as those described for rwflowpack.conf on page 75:
| ENABLED. | Whether this file has been configured. |
| CREATE_DIRECTORIES. | Whether to create directories. |
| LOG_TYPE. | The type of logging. |
| LOG_DIR. | The directory for log files. |
| PID_DIR. | The directory for the PID file. |
| USER. | The user to run as. |
Save the flowcap.conf file into the SCRIPT_CONFIG_LOCATION directory that you created above.
Check the settings in flowcap.conf by using the control script to start and stop flowcap (cf. Section 5.1.2.2):
$ sh $SILK_PATH/share/silk/etc/init.d/flowcap start
$ sh $SILK_PATH/share/silk/etc/init.d/flowcap stop
The log messages that flowcap generates will resemble:
Mar 26 17:20:34 sst flowcap[8810]: /usr/sbin/flowcap --pidfile=...
Mar 26 17:20:34 sst flowcap[8810]: Forked child 8812.  Parent exiting
Mar 26 17:20:34 sst flowcap[8812]: Opening new file.
Mar 26 17:20:34 sst flowcap[8812]: Opened new file 20070326212034_S0_ne...
...
Mar 26 17:20:42 sst flowcap[8812]: Removing empty file 20070326212034_S...
Mar 26 17:20:42 sst flowcap[8812]: Finished closing 20070326212034_S0_n...
Mar 26 17:20:42 sst flowcap[8812]: Stopped logging.
Add the flowcap control script to the collection machine’s boot sequence if you want flowcap to start when the machine boots. This process is similar to the one you followed for rwflowpack (see Section 5.1.2.3).
rwsender runs on the collection machine to transfer the files generated by flowcap to the rwreceiver daemon running on the packing machine.
The SCRIPT_CONFIG_LOCATION/rwsender.conf file is used by the control script to generate the command line for rwsender. An example rwsender.conf file is available in the $SILK_PATH/share/silk/etc/ directory. These are the variables in the rwsender.conf file you will need to change:
(--incoming-directory) This variable contains the full path to the directory where flowcap is writing files for transfer to rwflowpack. Set this to the FLOWCAP_DEST value you chose above.
(--processing-directory) This variable contains the full path to the directory where rwsender moves the incremental files it has accepted but not yet transferred. Set this to the SENDER_WORK value you chose above.
(--error-directory) This variable contains the full path to the directory where rwsender moves files that rwreceiver does not accept. One reason rwreceiver may not accept a file is if it has recently processed a file with that same name. Set this to the SENDER_ERROR value you chose in Section 5.1.1.
(--identifier) This variable’s value is the name that rwsender sends when it receives a connection from the rwreceiver client. This name must be unique among all rwsender processes that communicate with a single rwreceiver, and it should reflect that this is the rwsender for this particular sensor. These instructions suggest you use sensor-SENSOR where SENSOR is the name of the sensor.
(--mode) This determines whether rwsender runs as a server or a client. Verify that it says server.
(--server-port) This variable contains the port on which rwsender listens for new connections from
rwreceiver clients. You may use any value for the port, though you will have to run rwsender as
the root user if you use a value less than 1024. If you wish rwsender to listen on a particular host
address, you may prefix the port with the name or the IP address; the host and port must be separated
by a colon (:). When using an IPv6 address as the host, enclose the address in square brackets ([]),
and enclose the entire argument in single quotes (’) to prevent the shell from treating the brackets as
special characters. When the host is not provided, rwsender will listen on any address.
(--client-ident) This variable lists the identifier(s) of the rwreceiver(s) that are allowed to connect. Since you are configuring this rwsender to transfer files to a single rwreceiver, edit this value to contain the identifier that you selected in Section 5.1.3. If you used rcv-packer1, the configuration file would read:
RECEIVER_CLIENTS=‘cat <<’END_RECEIVERS’ # Do not modify this line
    rcv-packer1
END_RECEIVERS
‘ #Do not modify this line or the previous line
(--tls-ca) When this variable is set, GnuTLS is used for communication between rwsender and rwreceiver. If you wish to use GnuTLS, set this variable to the full path to the PEM encoded CA certificate file, rootcert.pem, that you copied into the CONFIG_FILE_DIR.
(--tls-pkcs12) This variable lists the full path to the DER encoded PKCS#12 file. Set this variable to the pkcs12.der that you copied into the CONFIG_FILE_DIR directory if you are using GnuTLS.
You will also need to change some of the following; they are the same as those described for rwflowpack.conf on page 75:
| ENABLED. | Whether this file has been configured. |
| CREATE_DIRECTORIES. | Whether to create directories. |
| LOG_TYPE. | The type of logging. |
| LOG_DIR. | The directory for log files. |
| PID_DIR. | The directory for the PID file. |
| USER. | The user to run as. |
Save the rwsender.conf file into the SCRIPT_CONFIG_LOCATION directory that you created above.
Check the settings in rwsender.conf by using the control script to start and stop rwsender:
$ sh $SILK_PATH/share/silk/etc/init.d/rwsender start
$ sh $SILK_PATH/share/silk/etc/init.d/rwsender stop
The log messages that rwsender generates will resemble:
Mar 26 17:48:50 sst rwsender[9068]: /usr/sbin/rwsender --pidfile=...
Mar 26 17:48:50 sst rwsender[9068]: Forked child 9070.  Parent exiting
Mar 26 17:48:50 sst rwsender[9070]: Incoming file handling thread started.
Mar 26 17:48:57 sst rwsender[9070]: Shutting down due to SIGINT signal
Mar 26 17:48:57 sst rwsender[9070]: Shutting down
Mar 26 17:48:57 sst rwsender[9070]: Incoming file handling thread stopped.
Mar 26 17:48:57 sst rwsender[9070]: Finished shutting down
Mar 26 17:48:57 sst rwsender[9070]: Stopped logging.
Add the rwsender control script to the collection machine’s boot sequence if you want rwsender to start when the machine boots. This process is similar to the one you followed for rwflowpack (see Section 5.1.2.3).
Now that you have created the rwsender.conf file on the collection machines, you can configure rwreceiver on the packing machine. To recap, rwreceiver runs on the packing machine to accept, from the collection machine(s), the files generated by flowcap and sent by rwsender.
The SCRIPT_CONFIG_LOCATION/rwreceiver.conf file is used by the control script to generate the command line for rwreceiver. An example rwreceiver.conf file is available in the $SILK_PATH/share/silk/etc/ directory. These are the variables in the rwreceiver.conf file you need to change:
(--destination-directory) This variable contains the full path to the directory rwflowpack is polling. Set this to the PACKER_INCOMING value you chose in Section 5.1.1.
(--identifier) This variable’s value is the name that rwreceiver sends when it contacts each rwsender daemon. Enter the value you selected in Section 5.1.3.
(--mode) This determines whether rwreceiver runs as a server or a client. Verify that it says client.
(--server-address) This variable contains multiple lines, where each line lists an rwsender server (host and port) to contact and the identifier that was specified when that rwsender was invoked. Using the name or IP address of each collection machine you configured and the IDENTIFIER and PORT values you specified when you configured rwsender (Section 5.2.3.1), update the SENDER_SERVERS variable to read
SENDER_SERVERS=‘cat <<’END_SENDERS’ # Do not modify this line
    IDENTIFIER1  HOST:PORT1
    IDENTIFIER2  HOST:PORT2
    ...
END_SENDERS
‘ #Do not modify this line or the previous line
If HOST is an IPv6 address, enclose the address in square brackets ([]).
(--tls-ca) When this variable is set, GnuTLS is used for communication between rwsender and rwreceiver. If you wish to use GnuTLS, set this variable to the full path to the PEM encoded CA certificate file, rootcert.pem, that you copied into the CONFIG_FILE_DIR in Section 5.1.5.
(--tls-pkcs12) This variable lists the full path to the DER encoded PKCS#12 file. Set this variable to the pkcs12.der that you copied into the CONFIG_FILE_DIR directory if you are using GnuTLS.
You will also need to change some of the following; they are the same as those described for rwflowpack.conf on page 75:
| ENABLED. | Whether this file has been configured. |
| CREATE_DIRECTORIES. | Whether to create directories. |
| LOG_TYPE. | The type of logging. |
| LOG_DIR. | The directory for log files. |
| PID_DIR. | The directory for the PID file. |
| USER. | The user to run as. |
Save the rwreceiver.conf file into the SCRIPT_CONFIG_LOCATION directory on the packing machine.
Check the settings in rwreceiver.conf by using the control script to start and stop rwreceiver:
$ sh $SILK_PATH/share/silk/etc/init.d/rwreceiver start
$ sh $SILK_PATH/share/silk/etc/init.d/rwreceiver stop
The log messages that rwreceiver generates will resemble:
Mar 26 18:18:52 sst rwreceiver[9465]: /usr/sbin/rwreceiver --pidfile=...
Mar 26 18:18:52 sst rwreceiver[9465]: Forked child 9467.  Parent exiting
Mar 26 18:19:11 sst rwreceiver[9467]: Shutting down due to SIGINT signal
Mar 26 18:19:11 sst rwreceiver[9467]: Shutting down
Mar 26 18:19:12 sst rwreceiver[9467]: Finished shutting down
Mar 26 18:19:12 sst rwreceiver[9467]: Stopped logging.
Add the rwreceiver control script to the collection machine’s boot sequence if you want rwreceiver to start when the machine boots. This process is similar to the one you followed for rwflowpack (see Section 5.1.2.3).
Each storage machine runs two daemons:
rwreceiver receives incremental files from the packing machine.
rwflowappend appends the SiLK flows in the incremental files to the hourly files.
Perform these steps on every storage machine where remote SiLK data storage occurs.
Choose locations and create the following directories if they do not exist:
The root of the directory tree where SiLK will be installed. Pass this value to the configure in the --prefix switch (cf. Section 2.2). If not specified, the default is /usr/local.
The root of the directory tree where the SiLK Flow files are permanently stored. This should correspond to the --enable-data-rootdir value that was passed to the configure script (see Section 2.2). If you do not pass that switch to configure, /data is the name of the directory.
The directory where rwreceiver deposits its files for processing by rwflowappend.
The directory where rwflowappend stores incremental files that cannot be appended to the hourly data files.
The directory for configuration files used by daemons.
An additional directory for configuration files; these files also may be used by daemons.
The directory in which rwflowappend’s and rwsender’s process identifier (PID) and log files are written.
Build and install the SiLK software as described in Section 2.
Copy the silk.conf file from the packing machine to this machine and save it in the SILK_DATA_ROOTDIR directory.
If desired, follow the instructions from Section 3 to create your site’s address map and country code files. You only need to do this on the first storage machine you configure. For additional storage machines, simply copy the files from the first storage machine.
If you are using GnuTLS, copy the rootcert.pem and pkcs12.der files that you created on the packing machine in Section 5.1.5 into the CONFIG_FILE_DIR directory on this machine.
rwflowappend runs on the storage machine to append the incremental files generated by rwflowpack to the hourly data files for use by the analysis tools.
The SCRIPT_CONFIG_LOCATION/rwflowappend.conf file is used by the control script to generate the command line for rwflowappend. An example rwflowappend.conf file is available in the $SILK_PATH/share/silk/etc/ directory. These are the variables in the rwflowappend.conf file you will need to change:
(--root-directory) This variable specifies the root directory for packed SiLK data files. Set this switch to the SILK_DATA_ROOTDIR value you chose above.
(--incoming-directory) This variable contains the full path to the directory that rwflowappend polls for incremental files. Set this to the APPEND_INCOMING value you chose above.
(--error-directory) This variable contains the full path to the directory where rwflowappend stores incremental files that it cannot append. Set this to the APPEND_ERROR value you chose above.
(--archive-directory) If this variable is set, rwflowappend archives the incremental files after it has processed them. Unset this variable to disable archiving, or enter the full path to your archive directory.
You will also need to change some of the following; they are the same as those described for rwflowpack.conf on page 75:
| ENABLED. | Whether this file has been configured. |
| CREATE_DIRECTORIES. | Whether to create directories. |
| LOG_TYPE. | The type of logging. |
| LOG_DIR. | The directory for log files. |
| PID_DIR. | The directory for the PID file. |
| USER. | The user to run as. |
Save the rwflowappend.conf file into the SCRIPT_CONFIG_LOCATION directory that you created above.
Check the settings in rwflowappend.conf by using the control script to start and stop rwflowappend:
$ sh $SILK_PATH/share/silk/etc/init.d/rwflowappend start
$ sh $SILK_PATH/share/silk/etc/init.d/rwflowappend stop
The log messages that rwflowappend generates will resemble:
Mar 26 17:31:06 sst rwflowappend[8892]: /usr/sbin/rwflowappend --pidfile=...
Mar 26 17:31:06 sst rwflowappend[8892]: Forked child 8894.  Parent exiting
Mar 26 17:31:06 sst rwflowappend[8894]: Starting file handling thread.
Mar 26 17:31:12 sst rwflowappend[8894]: Shutting down due to SIGINT signal
Mar 26 17:31:12 sst rwflowappend[8894]: Shutting down...
Mar 26 17:31:12 sst rwflowappend[8894]: Exiting file handling thread.
Mar 26 17:31:12 sst rwflowappend[8894]: Finished shutting down.
Mar 26 17:31:12 sst rwflowappend[8894]: Stopped logging.
Add the rwflowappend control script to the collection machine’s boot sequence if you want rwflowappend to start when the machine boots. This process is similar to the one you followed for rwflowpack (see Section 5.1.2.3).
rwreceiver runs on the storage machine to accept the incremental files from the rwsender daemon running on the packing machine.
The SCRIPT_CONFIG_LOCATION/rwreceiver.conf file is used by the control script to generate the command line for rwreceiver. An example rwreceiver.conf file is available in the $SILK_PATH/share/silk/etc/ directory. These are the variables in the rwreceiver.conf file you need to change:
(--destination-directory) This variable contains the full path to the directory rwflowappend is polling. Set this to the APPEND_INCOMING value you chose above.
(--identifier) This variable’s value is the name that rwreceiver sends when it is contacted by the rwsender client. This name must be unique among all rwreceiver processes that communicate with a single rwsender, and it should reflect that this is the rwreceiver for rwflowappend. These instructions use append-hostname .
(--mode) This determines whether rwreceiver runs as a server or a client. Verify that it says server.
(--server-port) This variable contains the port on which rwreceiver listens for new connections
from rwsender clients. You may use any value for the port, though you will have to run rwreceiver as
the root user if you use a value less than 1024. If you wish rwreceiver to listen on a particular host
address, you may prefix the port with the name or the IP address; the host and port must be separated
by a colon (:). When using an IPv6 address as the host, enclose the address in square brackets ([]),
and enclose the entire argument in single quotes (’) to prevent the shell from treating the brackets as
special characters. When the host is not provided, rwreceiver will listen on any address.
(--client-ident) This variable lists the identifier(s) of the rwsender(s) that are allowed to connect. Since you are configuring this rwreceiver to accept files from a single rwsender, edit this value to contain the identifier that you selected in Section 5.1.4. If you used send-packer1, the configuration file would read:
SENDER_CLIENTS=‘cat <<’END_SENDERS’ # Do not modify this line
    send-packer1
END_SENDERS
‘ #Do not modify this line or the previous line
(--tls-ca) When this variable is set, GnuTLS is used for communication between rwsender and rwreceiver. If you wish to use GnuTLS, set this variable to the full path to the PEM encoded CA certificate file, rootcert.pem, that you copied into the CONFIG_FILE_DIR.
(--tls-pkcs12) This variable lists the full path to the DER encoded PKCS#12 file. Set this variable to the pkcs12.der that you copied into the CONFIG_FILE_DIR directory if you are using GnuTLS.
You will also need to change some of the following; they are the same as those described for rwflowpack.conf on page 75:
| ENABLED. | Whether this file has been configured. |
| CREATE_DIRECTORIES. | Whether to create directories. |
| LOG_TYPE. | The type of logging. |
| LOG_DIR. | The directory for log files. |
| PID_DIR. | The directory for the PID file. |
| USER. | The user to run as. |
Save the rwreceiver.conf file into the SCRIPT_CONFIG_LOCATION directory that you created above.
Check the settings in rwreceiver.conf by using the control script to start and stop rwreceiver:
$ sh $SILK_PATH/share/silk/etc/init.d/rwreceiver start
$ sh $SILK_PATH/share/silk/etc/init.d/rwreceiver stop
The log messages that rwreceiver generates will resemble:
Mar 26 17:55:20 sst rwreceiver[9168]: /usr/sbin/rwreceiver --pidfile=...
Mar 26 17:55:20 sst rwreceiver[9168]: Forked child 9170.  Parent exiting
Mar 26 17:55:32 sst rwreceiver[9170]: Shutting down due to SIGINT signal
Mar 26 17:55:32 sst rwreceiver[9170]: Shutting down
Mar 26 17:55:32 sst rwreceiver[9170]: Finished shutting down
Mar 26 17:55:32 sst rwreceiver[9170]: Stopped logging.
Add the rwreceiver control script to the collection machine’s boot sequence if you want rwreceiver to start when the machine boots. This process is similar to the one you followed for rwflowpack (see Section 5.1.2.3).
Now that you have created the rwreceiver.conf file on the storage machines, you can configure rwsender on the packing machine. To recap, rwsender runs on the packing machine to transfer the incremental files generated by rwflowpack to the rwreceiver and rwflowappend processes on the storage machines.
The SCRIPT_CONFIG_LOCATION/rwsender.conf file is used by the control script to generate the command line for rwsender. An example rwsender.conf file is available in the $SILK_PATH/share/silk/etc/ directory. These are the variables in the rwsender.conf file you need to change:
(--incoming-directory) This variable contains the full path to the directory where rwflowpack writes the incremental files for transfer to rwflowappend. Set this to the PACKER_DEST value you chose in Section 5.1.1.
(--processing-directory) This variable contains the full path to the directory where rwsender moves the incremental files it has accepted but not yet transferred. Set this to the SENDER_WORK value you chose in Section 5.1.1.
(--error-directory) This variable contains the full path to the directory where rwsender moves files that rwreceiver does not accept. One reason rwreceiver may not accept a file is if it has recently processed a file with that same name. Set this to the SENDER_ERROR value you chose in Section 5.1.1.
(--identifier) This variable’s value is the name that rwsender sends when it connects to the rwreceiver daemon. Enter the value you selected in Section 5.1.4.
(--mode) This determines whether rwsender runs as a server or a client. Verify that it says client.
(--server-address) This variable contains multiple lines, where each line lists an rwreceiver server (host and port) to contact and the identifier that was specified when that rwreceiver was invoked. Using the name or IP address of each storage machine you configured and the IDENTIFIER and PORT values you specified when you configured rwreceiver (Section 5.4.3.1), update the RECEIVER_SERVERS variable to read
RECEIVER_SERVERS=‘cat <<’END_RECEIVERS’ # Do not modify this line
    IDENTIFIER1  HOST:PORT1
    IDENTIFIER2  HOST:PORT2
    ...
END_RECEIVERS
‘ #Do not modify this line or the previous line
If HOST is an IPv6 address, enclose the address in square brackets ([]).
(--tls-ca) When this variable is set, GnuTLS is used for communication between rwsender and rwreceiver. If you wish to use GnuTLS, set this variable to the full path to the PEM encoded CA certificate file, rootcert.pem, that you copied into the CONFIG_FILE_DIR in Section 5.1.5.
(--tls-pkcs12) This variable lists the full path to the DER encoded PKCS#12 file. Set this variable to the pkcs12.der that you copied into the CONFIG_FILE_DIR directory if you are using GnuTLS.
You will also need to change some of the following; they are the same as those described for rwflowpack.conf on page 75:
| ENABLED. | Whether this file has been configured. |
| CREATE_DIRECTORIES. | Whether to create directories. |
| LOG_TYPE. | The type of logging. |
| LOG_DIR. | The directory for log files. |
| PID_DIR. | The directory for the PID file. |
| USER. | The user to run as. |
Save the rwsender.conf file into the SCRIPT_CONFIG_LOCATION directory on the packing machine.
Check the settings in rwsender.conf by using the control script to start and stop rwsender:
$ sh $SILK_PATH/share/silk/etc/init.d/rwsender start
$ sh $SILK_PATH/share/silk/etc/init.d/rwsender stop
The log messages that rwsender generates will resemble:
Mar 26 18:04:50 sst rwsender[9363]: /usr/sbin/rwsender --pidfile=...
Mar 26 18:04:50 sst rwsender[9363]: Forked child 9364.  Parent exiting
Mar 26 18:04:50 sst rwsender[9364]: Incoming file handling thread started.
Mar 26 18:05:06 sst rwsender[9364]: Shutting down due to SIGINT signal
Mar 26 18:05:06 sst rwsender[9364]: Shutting down
Mar 26 18:05:06 sst rwsender[9364]: Incoming file handling thread stopped.
Mar 26 18:05:06 sst rwsender[9364]: Finished shutting down
Mar 26 18:05:06 sst rwsender[9364]: Stopped logging.
Add the rwsender control script to the collection machine’s boot sequence if you want rwsender to start when the machine boots. This process is similar to the one you followed for rwflowpack (see Section 5.1.2.3).
Once you have compiled and installed the software and configured the files used by the daemons, you are almost ready to begin collecting data.
First, you should ensure that the connections between the rwsender and rwreceiver processes are correctly configured. To test for a duplicate identifier entry, you should run all the rwsender and rwreceiver daemons that communicate with one another at the same time.
Once you know that the file transfer is correctly configured, you can start the daemons to collect, convert, and store the data.
As an initial test, you may want to enable a single path through the various daemons, and only start the other daemons once you are confident that your settings are correct. The single path makes clean-up easier if something needs to be changed. To use a single path, stop all but one of the rwreceiver processes on the storage machines, and start a single flowcap process.
To start the connection between the packer and the collection machines, on each collection machine start the rwsender daemon just as you did when testing its configuration in Section 5.2.3.2:
$ sh $SILK_PATH/share/silk/etc/init.d/rwsender start
Now start the rwreceiver on the packing machine (cf. Section 5.3.2):
$ sh $SILK_PATH/share/silk/etc/init.d/rwreceiver start
If all goes well, on each collection machine you will see log messages in the form:
Mar 26 18:25:26 sst rwsender[9550]: /usr/sbin/rwsender --pidfile=...
Mar 26 18:25:26 sst rwsender[9550]: Forked child 9552.  Parent exiting
Mar 26 18:25:26 sst rwsender[9552]: Incoming file handling thread started.
Mar 26 18:25:39 sst rwsender[9552]: Received connection from 127.0.0.1
Mar 26 18:25:39 sst rwsender[9552]: Connected to remote rcv-packer1
The log messages on the packing machine will be similar to:
Mar 26 18:25:39 sst rwreceiver[9584]: /usr/sbin/rwreceiver --pidfile=...
Mar 26 18:25:39 sst rwreceiver[9584]: Forked child 9586.  Parent exiting
Mar 26 18:25:39 sst rwreceiver[9586]: Connected to remote sensor-S1
Make certain that you see connections for each of the remote collection machines.
If the connections fail, make certain that the ports and machine names or IP addresses are all correct. To produce more verbose logging messages to help you debug the problem, you can set the LOG_LEVEL variable in rwsender.conf and/or rwreceiver.conf to debug and restart the daemons.
If you want to test the transfer of files between the machines, you can place any file into the FLOWCAP_DEST directory on a collection machine and it should be transferred to the PACKER_INCOMING directory on the packing machine. (Remember to remove this file before you start rwflowpack.)
To start the connection between the packer and the storage machines, on each storage machine start the rwreceiver daemon just as you did when testing its configuration in Section 5.4.3.2:
$ sh $SILK_PATH/share/silk/etc/init.d/rwreceiver start
Now start the rwsender on the packing machine (cf. Sections 5.5.2):
$ sh $SILK_PATH/share/silk/etc/init.d/rwsender start
If everything is successful, the log messages on the packing machine will be similar to:
Mar 26 18:43:30 sst rwsender[9790]: /usr/sbin/rwsender --pidfile=...
Mar 26 18:43:30 sst rwsender[9790]: Forked child 9792.  Parent exiting
Mar 26 18:43:30 sst rwsender[9792]: Incoming file handling thread started.
Mar 26 18:43:30 sst rwsender[9792]: Connected to remote append-sst
Make certain that you see connections for each of the remote storage machines.
On each storage machine you will see log messages in the form:
Mar 26 18:43:19 sst rwreceiver[9751]: /usr/sbin/rwreceiver --pidfile=...
Mar 26 18:43:19 sst rwreceiver[9751]: Forked child 9753.  Parent exiting
Mar 26 18:43:30 sst rwreceiver[9753]: Received connection from 127.0.0.1
Mar 26 18:43:30 sst rwreceiver[9753]: Connected to remote send-packer1
If the connections fail, make certain that the ports and machine names or IP addresses are all correct. To produce more verbose logging messages to help you debug the problem, you can set the LOG_LEVEL variable in rwsender.conf and/or rwreceiver.conf to debug and restart the daemons.
If you want to test the transfer of files between the machines, you can place any file into the PACKER_DEST directory on the packing machine and it should be transferred to the APPEND_INCOMING directory on all the storage machines. (Remember to remove this file before you start rwflowappend.)
Just as you did during testing (Section 5.4.2), start the rwflowappend daemon on each storage machine:
$ sh $SILK_PATH/share/silk/etc/init.d/rwflowappend start
Start the rwflowpack process on the packing machine:
$ sh $SILK_PATH/share/silk/etc/init.d/rwflowpack start
Finally, start the flowcap daemon on each collection machine:
$ sh $SILK_PATH/share/silk/etc/init.d/flowcap start
Follow the instructions in Section 8 to start the flow generator.
If flowcap will be listening for NetFlow traffic on UDP port(s), follow the instructions in Section 8.3 to increase the maximum socket buffer size allowed by your kernel.
This section describes how to configure your site to use the packing configuration that supports remote data collection. This configuration is depicted in Figure 1.5.
For this configuration, there is one machine called the packing machine and one or more additional machines referred to as collection machines. Each collection machine runs the flowcap daemon to collect the flows and store them in “flowcap files”. The rwsender daemon also runs on each collection machine, and it transfers the files from the collection machine to an rwreceiver daemon running on the packing machine. The packing machine runs the rwflowpack daemon to read these flowcap files and categorize and pack the flow records they contain. The analysis tools are installed on the packing machine to read and analyze the flow records.
If this does not describe your packing configuration, refer to the list of possible configurations in Section 1.3.
The configuration in this section is similar to that in Section 5. This section will describe the configuration of rwflowpack on the packing machine, and then refer you back to Section 5 to complete the installation.
The packing machine runs two daemons:
rwreceiver receives flowcap files from the collection machines
rwflowpack converts and categorizes the flows it reads from the flowcap files and stores the SiLK flows in binary flat files.
Perform these steps on the packing machine to install the software and to configure the rwflowpack daemon.
Choose locations and create the following directories if they do not exist:
The root of the directory tree where SiLK will be installed. Pass this value to the configure in the --prefix switch (cf. Section 2.2). If not specified, the default is /usr/local.
The root of the directory tree where the SiLK Flow files are permanently stored. This should correspond to the --enable-data-rootdir value that was passed to the configure script (see Section 2.2). If you do not pass that switch to configure, /data is the name of the directory.
The directory where rwreceiver deposits its files for processing by rwflowpack.
The directory containing configuration files used by daemons. Often this is the /etc directory for system daemons; RedHat Linux uses /etc/sysconfig for this value. The value SiLK uses is determined by the --sysconfdir switch to configure, and it defaults to $SILK_PATH/etc if the --sysconfdir switch was not given. When you ran configure, the example sh-scripts described in the next section were modified to use this location.
An additional directory for configuration files; these files also may be used by daemons. We recommend using $SILK_PATH/etc/silk/ for this directory, though you may use $SILK_PATH/share/silk/ or the SCRIPT_CONFIG_LOCATION for this setting. There is no part of SiLK that requires this to be in a particular location.
The directory in which rwflowpack’s and rwreceiver’s process identifier (PID) and log files are written.
Build and install the SiLK software as described in Sections 2 and 3. Be certain to customize silk.conf and install it in the SILK_DATA_ROOTDIR directory.
Follow the instructions in Section 4.1 to create the Sensor Configuration file, and copy the file into the CONFIG_FILE_DIR directory.
If you wish to use GnuTLS to secure the connection between the collection machine and the packing machine, create the Certificate Authority file and PKCS#12 file as described in Section 5.1.5. Copy these files into the CONFIG_FILE_DIR directory.
To provide easier control of the SiLK daemons in UNIX-like environments, example sh-scripts are provided. The names of these scripts are the same as the daemon they control. The scripts are installed in the $SILK_PATH/share/silk/etc/init.d/ directory, but you should copy them to the standard location for start-up scripts on your system (e.g., /etc/init.d/ on Linux and other SysV-type systems).
To generate the command line for the daemon named daemon , the control script checks settings in the text file SCRIPT_CONFIG_LOCATION/daemon.conf. Before using a control script, you must create a daemon.conf file and customize it for your environment.
For each daemon, an example configuration file is installed in the $SILK_PATH/share/silk/etc/ directory. You will need to copy the file to the SCRIPT_CONFIG_LOCATION directory and modify it as described in this section. (The format of these configuration files may change between releases of SiLK. When upgrading from a previous release, you should merge your previous settings into the new version of the configuration file.)
You should not need to edit any of the control scripts; however, be aware the value of SCRIPT_CONFIG_LOCATION they use was set when you ran configure.
Many of the variable names in rwflowpack.conf correspond to a command line switch on rwflowpack. By referencing the rwflowpack manual page and the documentation for each variable in that file, you should be able to determine how set each variable. This section highlights some of the settings. The switch that the variable controls follows each name.
(--sensor-configuration) This variable contains the full path to the Sensor Configuration file you created in Section 4.1 and copied into the CONFIG_FILE_DIR directory above.
(--packing-logic) This variable may be blank or it may contain the name of (or the path to) the plug-in that rwflowpack will load to get the “packing logic” it uses. The packing logic specifies how rwflowpack determines into which category each flow record is written (for example, whether a record is incoming or outgoing). The packing logic uses values from the SENSOR_CONFIG file. You may also specify the packing logic plug-in with the packing-logic statement in the silk.conf site configuration file. The PACKING_LOGIC value must be empty if SiLK was configured without support for the packing logic plug-in (cf. Section 2.3.8).
(--root-directory) This variable specifies the root directory for packed SiLK data files. Set this switch to the SILK_DATA_ROOTDIR value you chose above.
(--incoming-directory) This variable specifies where rwflowpack looks for flowcap files. Set this to the PACKER_INCOMING value you chose above.
(--archive-directory) If this variable is set, rwflowpack archives the flowcap files after it has processed them. Unset this variable to disable archiving, or enter the full path to your archive directory.
(--input-mode) This variable determines whether data is being read directly from the network or whether rwflowpack is processing files generated by flowcap. Verify that it says fcfiles.
(--output-mode) This variable determines whether rwflowpack writes to the repository itself or relies on rwflowappend to write to the repository. Verify that it says local-storage.
Set this variable to any non-empty value. It is used by the control script to determine whether the administrator has completed the configuration.
When this value is yes, the control script creates any directories that the daemon requires but are nonexistent.
The daemons support writing their log messages to the syslog(3) facility or to local log files rotated at midnight local time. Set this to syslog to use syslog, or to legacy to use local log files.
When the LOG_TYPE is legacy, the logging files are written to this directory. Set this variable to the LOGGING_DIR value you chose above. The /var/log directory is often used for log files.
The daemons write their process identifier (PID) to a file in this directory. By default this variable has the same value as LOG_DIR, but you may wish to change it. On many systems, the /var/run directory holds this information.
The control script switches to this user (see su(1)) when starting the daemon. The default user is root. Note that all of SiLK can be run as an ordinary user.
Save the rwflowpack.conf file into the SCRIPT_CONFIG_LOCATION directory that you created above.
Follow the instructions in Section 5.1.2.2 to test whether the settings in rwflowpack.conf are correct.
If you wish, you can make rwflowpack start automatically when the packing machine boots by adding the rwflowpack control script to its boot sequence. This process is described in Section 5.1.2.3.
rwreceiver runs on the packing machine to accept, from the collection machine(s), the files generated by flowcap and sent by rwsender.
Each rwsender and rwreceiver is configured with an identifier of its own and the identifier(s) of the rwreceiver(s) or rwsender(s) that may connect to it. The connection will not be established if the identifier provided by other process is not recognized. In addition, every rwsender that communicates with the same rwreceiver must have a unique identifier; likewise, every rwreceiver that communicates with the same rwsender must have a unique identifier.
Create the identifier that the rwreceiver client on the packing machine sends when it contacts the
rwsender daemon running on each collection machine. The identifier should contain only printable,
non-whitespace characters; the following characters are illegal: colon (:), slash (/ and \), period (.), and
comma (,).
The identifier should reflect that this is the rwreceiver process associated with the packer. These instructions use rcv-packer1.
You will use this identifier when you set up the rwsender daemon on each collection machine in Section 5.2.3, and when you configure rwreceiver on the packing machine (Section 5.3).
Setting up each remote collection machine follows the procedure described in Section 5.2.
After you configure the remote collection machines, follow the instructions in Section 5.3 to configure rwreceiver on the packing machine.
Follow the instructions in Section 5.6—ignoring Sections 5.6.2 and 5.6.3—to start the complete collection system.
This section describes how to configure your site to use the packing configuration that supports remote SiLK Flow storage. Figure 1.6 shows this configuration.
For this configuration, there is one machine called the packing machine and one or more additional machines called storage machines. The packing machine runs the rwflowpack daemon to collect the flow records, categorize them, and store them in small “incremental files”. The rwsender daemon also runs on the packing machine, and it transfers the incremental files from the packing machine to an rwreceiver daemon running on each storage machine. Each storage machine also runs the rwflowappend daemon to append the incremental files to their final location in hourly files. In addition, each storage machine has the SiLK analysis tools installed to read and analyze the data in the hourly files.
If this does not describe your packing configuration, refer to the list of possible configurations in Section 1.3.
The configuration in this section is similar to that in Section 5. This section will describe the configuration of rwflowpack on the packing machine, and then refer you back to Section 5 to complete the installation.
The packing machine runs two daemons:
rwflowpack collects flows from sensors, converts and categorizes the flows, and creates incremental files.
rwsender transfers the incremental files to the storage machines.
Perform these steps on the packing machine to install the software and to configure the rwflowpack daemon.
Choose locations and create the following directories if they do not exist:
The root of the directory tree where SiLK will be installed. Pass this value to the configure in the --prefix switch (cf. Section 2.2). If not specified, the default is /usr/local.
The directory where rwflowpack writes the incremental files for delivery to rwflowappend. rwsender polls this directory and accepts the files that it finds for delivery to the rwreceiver processes on the storage machines.
The directory where rwsender stores the files that it has accepted but not yet sent to the intended rwreceiver(s).
The directory where rwsender stores the files that are not accepted by rwreceiver.
The directory containing configuration files used by daemons. Often this is the /etc directory for system daemons; RedHat Linux uses /etc/sysconfig for this value. The value SiLK uses is determined by the --sysconfdir switch to configure, and it defaults to $SILK_PATH/etc if the --sysconfdir switch was not given. When you ran configure, the example sh-scripts described in the next section were modified to use this location.
An additional directory for configuration files; these files also may be used by daemons. We recommend using $SILK_PATH/etc/silk/ for this directory, though you may use $SILK_PATH/share/silk/ or the SCRIPT_CONFIG_LOCATION for this setting. There is no part of SiLK that requires this to be in a particular location.
The directory in which rwflowpack’s and rwsender’s process identifier (PID) and log files are written.
Build and install the SiLK software as described in Section 2. Since you will not be storing the SiLK flows on the packing machine, you may ignore the --enable-data-rootdir switch on this machine. For faster compilation and to save disk space, you can avoid building the analysis tools by passing the --disable-analysis-tools switch to configure.
Follow the instructions in Section 3.1 to customize the silk.conf file, and save it to $SILK_PATH/share/silk/silk.conf so rwflowpack will locate it. You can ignore the remainder of Section 3 on the packing machine.
Follow the instructions in Section 4.1 to create the Sensor Configuration file, and copy the file into the CONFIG_FILE_DIR directory.
If you wish to use GnuTLS to secure the connection between the collection machine and the packing machine, create the Certificate Authority file and PKCS#12 file as described in Section 5.1.5. Copy these files into the CONFIG_FILE_DIR directory.
To provide easier control of the SiLK daemons in UNIX-like environments, example sh-scripts are provided. The names of these scripts are the same as the daemon they control. The scripts are installed in the $SILK_PATH/share/silk/etc/init.d/ directory, but you should copy them to the standard location for start-up scripts on your system (e.g., /etc/init.d/ on Linux and other SysV-type systems).
To generate the command line for the daemon named daemon , the control script checks settings in the text file SCRIPT_CONFIG_LOCATION/daemon.conf. Before using a control script, you must create a daemon.conf file and customize it for your environment.
For each daemon, an example configuration file is installed in the $SILK_PATH/share/silk/etc/ directory. You will need to copy the file to the SCRIPT_CONFIG_LOCATION directory and modify it as described in this section. (The format of these configuration files may change between releases of SiLK. When upgrading from a previous release, you should merge your previous settings into the new version of the configuration file.)
You should not need to edit any of the control scripts; however, be aware the value of SCRIPT_CONFIG_LOCATION they use was set when you ran configure.
Many of the variable names in rwflowpack.conf correspond to a command line switch on rwflowpack. By referencing the rwflowpack manual page and the documentation for each variable in that file, you should be able to determine how set each variable. This section highlights some of the settings. The switch that the variable controls follows each name.
(--sensor-configuration) This variable contains the full path to the Sensor Configuration file you created in Section 4.1 and copied into the CONFIG_FILE_DIR directory above.
(--packing-logic) This variable may be blank or it may contain the name of (or the path to) the plug-in that rwflowpack will load to get the “packing logic” it uses. The packing logic specifies how rwflowpack determines into which category each flow record is written (for example, whether a record is incoming or outgoing). The packing logic uses values from the SENSOR_CONFIG file. You may also specify the packing logic plug-in with the packing-logic statement in the silk.conf site configuration file. The PACKING_LOGIC value must be empty if SiLK was configured without support for the packing logic plug-in (cf. Section 2.3.8).
(--incremental-directory) This variable names the full path of the directory where rwflowpack writes the incremental files for processing by rwsender. Set this variable to the PACKER_DEST value you chose above. (Note: This configuration is valid for SiLK-3.6.0 and later; for older rwflowpacks, see that version’s Installation Handbook.)
(--input-mode) This variable determines whether data is being read directly from the network or whether rwflowpack is processing files generated by flowcap. Verify that it says stream.
(--output-mode) This variable determines whether rwflowpack writes to the repository itself or relies on rwflowappend to write to the repository. Verify that it says sending.
Set this variable to any non-empty value. It is used by the control script to determine whether the administrator has completed the configuration.
When this value is yes, the control script creates any directories that the daemon requires but are nonexistent.
The daemons support writing their log messages to the syslog(3) facility or to local log files rotated at midnight local time. Set this to syslog to use syslog, or to legacy to use local log files.
When the LOG_TYPE is legacy, the logging files are written to this directory. Set this variable to the LOGGING_DIR value you chose above. The /var/log directory is often used for log files.
The daemons write their process identifier (PID) to a file in this directory. By default this variable has the same value as LOG_DIR, but you may wish to change it. On many systems, the /var/run directory holds this information.
The control script switches to this user (see su(1)) when starting the daemon. The default user is root. Note that all of SiLK can be run as an ordinary user.
Save the rwflowpack.conf file into the SCRIPT_CONFIG_LOCATION directory that you created above.
Follow the instructions in Section 5.1.2.2 to test whether the settings in rwflowpack.conf are correct.
If you wish, you can make rwflowpack start automatically when the packing machine boots by adding the rwflowpack control script to its boot sequence. This process is described in Section 5.1.2.3.
rwsender runs on the packing machine to transfer the incremental files generated by rwflowpack to the rwreceiver and rwflowappend processes on the storage machines.
Each rwsender and rwreceiver is configured with an identifier of its own and the identifier(s) of the rwreceiver(s) or rwsender(s) that may connect to it. The connection will not be established if the identifier provided by other process is not recognized. In addition, every rwsender that communicates with the same rwreceiver must have a unique identifier; likewise, every rwreceiver that communicates with the same rwsender must have a unique identifier.
Create the identifier that the rwsender client on the packing machine sends when it contacts the
rwreceiver daemon running on each storage machine. The identifier should contain only printable,
non-whitespace characters; the following characters are illegal: colon (:), slash (/ and \), period (.), and
comma (,).
The identifier should reflect that this is the rwsender process associated with the packer. These instructions suggest you use send-packer1.
You will use this identifier when you set up the rwreceiver daemon on each storage machine in Section 5.4.3, and when you configure rwsender on the packing machine (Section 5.5).
Setting up each remote storage machine follows the procedure described in Section 5.4.
After you configure the remote storage machines, follow the instructions in Section 5.5 to configure rwsender on the packing machine.
Follow the instructions in Section 5.6—ignoring Sections 5.6.1 and 5.6.5—to start the complete collection system.
Now that the daemons are installed and listening for data, it is time to provide them with data. This section describes
the switches to pass to the YAF software to process pcap data or data from an Endace DAG card
the steps necessary to enable NetFlow v5 on a router
a recommended kernel setting for machines that receive flow data
For SiLK to use the YAF Flow Collection software, you must install libfixbuf-1.7.0 (https://tools.netsa.cert.org/fixbuf/) before you install SiLK, and SiLK’s configure script must notice that libfixbuf is installed. See the libfixbuf documentation for instructions on installing it. If SiLK’s configure script does not find your libfixbuf installation, refer to Section 2.3.7 in this handbook for assistance.
Once both YAF and SiLK are installed, getting them to communicate is straightforward.
You need to create an IPFIX probe in your Sensor Configuration file so that rwflowpack or flowcap knows to listen for IPFIX flows. Section 4.1 and the sensor.conf(5) manual page describe the Sensor Configuration syntax. The examples in this section assume the collection daemon (rwflowpack or flowcap) is running on the machine whose IP is 10.1.18.2 and the daemon and YAF are communicating on port 18002.
In the sensor.conf file, the required probe block, where the probe is named Bravo, is:
probe Bravo ipfix
    listen-on-port 18002
    protocol tcp
end probe
This section gives instructions on invoking YAF. In all cases, note the use of the --silk option to YAF; this switch causes YAF to break the IPFIX specification but provides additional analysis capabilities in SiLK. See the yaf(1) manual page for details.
To perform live capture on an interface (e.g., eth0), use the following command. Note the use of sudo; the YAF software will drop its privileges and become user after binding to the interface.
sudo yaf --silk --ipfix=tcp --live --become-user user \
    --in=eth0 --out=10.1.18.2 --ipfix-port=18002
When YAF is configured with the --with-dag option, it can accept packets from an Endace DAG card (e.g., dag0). This invocation is similar to the previous one:
sudo yaf --silk --ipfix=tcp --dag --become-user user \
    --in=dag0 --out=10.1.18.2 --ipfix-port=18002
To have YAF process a packet capture (pcap) dump file (such as that produced by tcpdump(1)), run:
yaf --silk --ipfix=tcp \
    --in=pcap-file --out=10.1.18.2 --ipfix-port=18002
If you have several packet capture files to process, you can pass a list of files to YAF and specify --caplist. Since YAF will treat the files as a single stream, you need to make certain the file names occur in ascending time order. Note that the files cannot be compressed.
yaf --silk --ipfix=tcp --caplist \
    --in=file-list.txt --out=10.1.18.2 --ipfix-port=18002
To have YAF process a directory of packet capture files, where the files are named such that they are naturally listed in ascending time order, use:
ls | yaf --silk --ipfix=tcp --caplist \
    --in=- --out=10.1.18.2 --ipfix-port=18002
See the YAF documentation for additional switches, such as those that control logging.
You will need to perform these steps for each router you wish to instrument. The examples in this section assume the collection daemon (rwflowpack or flowcap) is running on the machine whose IP is 10.1.18.1, and that the daemon and router is communicating on port 18001.
In the sensor.conf file, the required probe block, where the probe is named Alpha, is:
probe Alpha netflow-v5
    listen-on-port 18001
    protocol udp
end probe
The timestamps on the NetFlow records will be based on the timestamps received from the router, and we suggest using ntp to minimize drift in the router’s clock. To synchronize the router’s time with that from the time server running at ip-address, use the Cisco IOS command
ntp server ip-address
The router needs to know where to send the NetFlow PDUs: the host and port on which rwflowpack or flowcap is listening. (If you are configuring multiple routers, you’ll need to use a unique ip-address:port pair for each router.) To set this information on the router, give the command
ip flow-export 10.1.18.1 18001
To make certain the router exports NetFlow version 5 records, which the SiLK tools require, issue
ip flow-export version 5
SiLK assumes no flow records are longer than 60 minutes—this means a long TCP session (such as an interactive ssh session) will be broken across multiple flow records. To set the active timeout on your Cisco router (30 minutes is the default for Cisco), use the IOS command:
ip flow-cache active-timeout 30
When the router is rebooted, it can reassign the SNMP interface numbers. This can create a problem, as the SNMP interface that was facing the Internet could now be facing your organization, resulting in the incoming and outgoing flows being reversed. To prevent this problem, tell the router to use persistent settings for the interface numbers. The easiest solution is to enable global persistence with the IOS command
snmp-server ifindex persist
and then save the configuration with the EXEC mode command
copy running-config startup-config
See the following link for more information on IfIndex persistence, including instructions on setting persistence on an interface-by-interface basis: http://www.cisco.com/en/US/docs/ios/12_1t/12_1t5/feature/guide/dt5ifidx.html.
Finally, to enable NetFlow, issue the IOS command
ip route-cache flow
Network traffic tends to be “bursty”: when you make an HTTP request, several servers may respond feeding you pages, images, and ads. To avoid losing records, it is important for each program receiving flow data to have a large socket buffer. The SiLK software will attempt to set the socket buffer size to the largest size the kernel will allow, up to a maximum of 8MB. To ensure that the programs can use the full 8MB buffer, we recommend increasing the maximum socket buffer size on each machine that has incoming flows. When using NetFlow, the machine running rwflowpack or flowcap and receiving the NetFlow PDUs should have its socket buffer adjusted.
To increase the maximum allowable socket buffer size on a running Linux system:
echo 8388608 > /proc/sys/net/core/rmem_max
On a running Solaris box, issue:
ndd -set /dev/udp udp_max_buf 8388608
Those lines may be added to the system’s start-up sequence (e.g., /etc/rc2.d/S99ndd) to make the change persistent across reboots.
This section describes how a flow record read from an external source is processed to become SiLK Flow record. For information on installing SiLK’s flow collection and storage tools, refer to Section 4 or 5.
The most simple SiLK configuration is the Single machine configuration, described in Section 1.3.1. In this configuration, the rwflowpack daemon collects NetFlow v5 flow records, NetFlow v9 flow records, or flow records that follow the Internet Protocol Flow Information eXport (IPFIX) standard. rwflowpack converts the information from these external flow formats to the SiLK format, and some information from the source record is dropped to keep each individual SiLK record small. Next, rwflowpack categorizes the SiLK flow records to determine where on disk they will be stored. Finally, rwflowpack writes the SiLK records into binary flat files where each file represents a specific category, sensor, and hour. This entire process is referred to as packing. The term packing logic refers to the decision process that rwflowpack uses to categorize a flow.
(In the more complex configurations, it may be the flowcap daemon that collects the flow records in the external formats and converts them to a SiLK format. The rwflowappend deamon may be responsible for writing the records into their final location in the data repository of hourly files. These differences are largely immaterial for this section, which describes the categorization process.)
A router will create a NetFlow record for IP packets that traverse the router within a certain time window and have identical IP protocols, identical source and destination IP addresses, and identical source and destination ports. The NetFlow record contains
information taken from the IP packet headers for the traffic the flow represents
IP protocol
source and destination IP addresses
source and destination ports for TCP and UDP
TCP flag information
sums of packets and bytes (octets) for the packets in the flow
the times when the first and last packets of the flow were seen
routing information (the next-hop IP and the input and output SNMP interfaces on which the packets entered and left the router).
NetFlow data is strictly unidirectional: a TCP conversation passing through a router causes the router to generate two sets of flow records—one for each side of the conversation.
Over time, NetFlow became a de facto standard for flow data. The Internet Protocol Flow Information eXport (IPFIX) working group (http://www.ietf.org/dyn/wg/charter/ipfix-charter.html) grew out of a desire to standardize the NetFlow format. SiLK handles IPFIX records in much the same way that it handles NetFlow records. (Support for IPFIX requires that SiLK is built with libfixbuf support.)
rwflowpack categorizes each flow to determine where to store it, and the category also determines the format of the file that contains the flow record. This categorization is handled by a plug-in that rwflowpack loads at run-time. The best place to specify the name of this plug-in is in the packing-logic statement in the silk.conf site configuration file. You may also specify the location of the plug-in with the --packing-logic switch to rwflowpack.
This section describes the categorization that the twoway site provides. The packing logic for other sites will be different.
Since NetFlow data is unidirectional, the first part of categorization determines whether the flow entered or left the monitored network. There are three ways to do this:
Explicitly set the source and destination networks for all flows. For example, if you are monitoring a network link that only sees incoming traffic, you could specify that all flows are coming from the external network and going to the internal network.
Determine whether the source and destination IPs on a flow are internal or external to the monitored network; categorizing a flow as incoming (source is external; destination is internal) or outgoing is straightforward. Flows could also be categorized as internal to internal (one may see these on a router that acts both as a gateway and as a part of the intranet core) or as external to external.
Examine the SNMP (Simple Network Management Protocol) interface indexes that are stored on the flow itself and indicate how the flow was handled by the router. The difficulty with this approach is that you must know which SNMP indexes on the router are connected to the external network and which are connected internally to the monitored network. (This can be institutionally difficult if the group that controls the router [e.g., Network Operations] is separate from the group that is monitoring the network for security reasons.) When lists of both external and internal SNMP interfaces are provided, flows can be categorized just as they are in the IP-based case: Flows entering the router from an external SNMP interface and leaving the router on an internal SNMP interface are incoming, etc.
The IP-based approach works well for a small, well-contained IP space, but it can be unwieldy if the IP space of the monitored network is large and discontinuous or if there is no well-defined IP space solely contained in the monitored network. However, the IP-based approach is appropriate when you have data that does not have SNMP information, such as IPFIX flows or when you are generating flow records from a packet capture (pcap) file (e.g., from the output of tcpdump). Although the initial configuration of the SNMP approach is more difficult, this method has the advantage of being computationally faster than the IP-based method, and it ensures that the flows reflect the way the router is actually moving the traffic into and out of your network, not the way you think it should be routing the traffic.
Directions for using flow data and lists of IPs to determine the external SNMP interfaces are presented in Appendix A.4.
The source-network and destination-network commands in the Sensor Configuration file (Section 4.1) are used when you wish to explicitly set the direction of the flows. The value to these commands is either external or internal.
To have rwflowpack use the IP-based approach, specify the monitored network’s IP space in the internal-ipblock command of each sensor, and set the external-ipblock to the keyword remainder.
To use the SNMP approach, set the external-interfaces to the list of SNMP interfaces that face outside the monitored network, and either do not specify an internal-interfaces command or set it to the list of SNMP interfaces that connect into the monitored network. (If the internal-interfaces is not provided, it is treated as if it had the value remainder.) Alternatively, you can specify the internal-interfaces as a list and explicitly set the external-interfaces to the keyword remainder.
An additional part of categorizing a flow is to determine what the router did with the packets that the flow represents. A flow record does not have to represent packets that entered or left the monitored network (which we call routed packets); instead, a record may represent packets that did not leave the router; these packets are considered not-routed or null. This behavior occurs when
the packets are a routing protocol message (e.g., BGP) meant for the router itself
the packets violated the router’s access control list (ACL)
To determine if a flow was not-routed, the output SNMP index of the flow is compared to the null-interface value. If there is a match, the flow is categorized as not-routed.
Note: Since SiLK-1.0.0, the null-interface is longer set by default. You must explicitly set it to categorize flows as non-routed. Cisco routers use 0 as the output SNMP index for a non-routed flow.
Since web traffic (or traffic that masquerades as web traffic) makes up such a large percentage of flows, additional packing is performed on these flows. The fixed-protocol (TCP) and limited number of web-server-side ports (80 (http), 443 (https), or 8080 (http-alt)) allow routed-web traffic to be packed in a smaller record. Although the savings is only a couple of bytes per record, these can add up to substantial savings over the course of a day. There is certainly no guarantee that routed-web traffic is entirely HTTP-based or that there is no HTTP-traffic in the remaining routed categories; the web/non-web split is a simple heuristic that gets it right most of the time.
Similar to the separation for web traffic, an additional split that can occur is to store the routed ICMP traffic separately from other traffic in a routed-icmp category. Currently, there are no file formats that take advantage of the possible space savings.
The categories (which may also be called flowtypes or types) for the twoway site are:
Flows that are seen at the sensor but never enter the monitored network. These are flows where the source and destination IP addresses are both outside the monitored network, or where the incoming and outgoing SNMP interfaces both face outside the monitored network.
Incoming flows that are blocked or are for the router. These are non-routed flows that entered the router through an SNMP interface that connects outside the monitored network.
Incoming flows that do not match the following two categories. These are routed records where the source IP is external and the destination IP is internal, or where the incoming SNMP interface faces outside the monitored network and the outgoing SNMP interface faces into the network.
Incoming flows that are probably web traffic (80/tcp, 443/tcp, or 8080/tcp); i.e., routed-web traffic that enters the network.
Similar to in where the protocol is ICMP.
Flows that stay inside the monitored network. These are flows where the source and destination IP addresses are both inside the monitored network, or where the incoming and outgoing SNMP interfaces are both connected into the monitored network.
Outgoing flows that are blocked or are for the router. These are non-routed flows that entered the router an SNMP interface that connects into the monitored network.
Outgoing flows that do not match the following two categories. These are routed records where the source IP is internal and the destination IP is external, or where the incoming SNMP interface connects into the monitored network, and the outgoing SNMP interface faces outside the network.
Outgoing flows that are probably web traffic.
Similar to out where the protocol is ICMP.
Flows that do not match any other rule. One source of other flows is traffic on the router using an SNMP interface that is not specified in the internal-interfaces or external-interfaces lists.
The packing logic in use prior to SiLK-0.11.0 is called generic, and it is available in the $SILK_PATH/lib/silk/packlogic-generic.so plug-in. It is similar to the twoway site, but it does not provide the ext2ext, int2int, or other categories, and the incoming versus outgoing test is slightly different. In the generic packing logic, rwflowpack tests to see if a flow is incoming; that is, whether the source IP is outside the monitored network or the incoming SNMP interface faces outside the network. Any flow that does not match the rules for an incoming flow is considered an outgoing flow.
Once each SiLK Flow record is categorized, it is stored on disk in a directory tree rooted at a directory called the SILK_DATA_ROOTDIR. When you run configure, you specify a default value of the SILK_DATA_ROOTDIR (see Section 2.2) which is compiled into the rwfilter program. The default can be modified at run-time with the --data-rootdir switch or by setting the SILK_DATA_ROOTDIR environment variable.
The layout of the tree under SILK_DATA_ROOTDIR can be customized by editing the path-format value in the silk.conf file. In the default layout, the directories directly under SILK_DATA_ROOTDIR correspond to the SiLK Flow record categories. An example subdirectory would be $SILK_DATA_ROOTDIR/inweb, which would contain the SiLK Flow records for incoming routed-web traffic. Within each of these directories are date directories, in the form YYYY/MM/DD . For example, output web files for October 4th, 2003 are recorded in:
$SILK_DATA_ROOTDIR/outweb/2003/10/04/
Each date directory contains the binary SiLK Flow files, one per hour per sensor per category (flowtype). The file names include the date and type information, and are written in the form: flowType-sensorName_YYYYMMDD.HH. Note that the date and hour are based on UTC time, not local time.
The flowType corresponds to how the flow records were categorized (e.g., iw denotes a file containing incoming routed-web records). The sensorName identifies the sensor where the flow was collected.
As explained in Appendix 8.3, rwflowpack can determine whether flows represent inbound or outbound traffic by examining either the IP addresses in the flows or their SNMP interface values. This Appendix explains how to discover the interfaces values by collecting flow data and examining it with SiLK. You may ignore this appendix if you are using the IP address approach, or if you have another method to determine the SNMP interface numbers your router is using.
To pack flows by the SNMP interface values, rwflowpack needs to know which of the router’s interfaces are the external interfaces (i.e., facing outside the monitored network). (For a border router, these are the interfaces that connect to the ISP.) One way to determine these interfaces is to use the SiLK tools to collect data and compare the source and destination IP addresses with the IP addresses of the monitored network. The approach outlined below will not work if the monitored network does not have a well-defined set of exclusive IP addresses.
Begin by creating an IPset of the monitored network’s address space. To do this, list the network’s CIDR blocks in a text file, one CIDR address per line, and save this file as myips.txt. If your address space is 192.168.0.0/16, you could run
$ echo "192.168.0.0/16" > myips.txt
To convert the text listing to a binary IPset file, issue the command
$ rwsetbuild myips.txt myips.set
The file myips.set is a binary representation of your address space. You can use the rwsetcat command to list the contents of the file, though beware that the default output is one address (/32) per line, so there can be a lot of output. You can use the --cidr switch to print the output in CIDR notation. Supplying the --print-statistics or --network-structure switch should also produce some useful output for sanity checking the IPset file. For example, if your network is 192.168.0.0/16, you will see:
$ rwsetcat --print-statistics myips.set
Network Summary
        minimumIP = 192.168.0.0
        maximumIP = 192.168.255.255
             65536 hosts (/32s),    0.001526% of 2^32
                 1 occupied /8,     0.390625% of 2^8
                 1 occupied /16,    0.001526% of 2^16
               256 occupied /24s,   0.001526% of 2^24
              2048 occupied /27s,   0.001526% of 2^27
$ rwsetcat --network-structure=BTS myips.set
  192.168.0.0/16    | 65536 hosts in 256 /24s and 2048 /27s
TOTAL               | 65536 hosts in 1 /8, 1 /16, 256 /24s, and 2048 /27s
In order to identify which interfaces are external, configure rwflowpack to categorize all data as incoming null, then determine what subset of records actually represent incoming traffic by looking at the source and destination IP addresses. Do this by configuring the Sensor Configuration file (see Section 4.1) so that the flows come from the external network and go to the null network.
For example, if your site as an Alpha sensor, you would create the following sensor.conf file to collect NetFlow v5 traffic on port 8092:
probe Alpha netflow-v5
    listen-on-port 8092
    protocol udp
end probe

sensor Alpha
    netflow-v5-probes    Alpha
    source-network       external
    destination-network  null
end sensor
You need to tell rwflowpack to include the SNMP interface numbers in the files it creates. Add the option --pack-interfaces to the invocation of rwflowpack by modifying the rwflowpack.conf configuration file. You may also want to decrease the --flush-timeout, which affects the amount of data rwflowpack stores in RAM before writing the records to disk. The default is two minutes, but since you are waiting for the data, a value of 30 seconds is reasonable.
Near the bottom of the rwflowpack.conf file is the line:
EXTRA_OPTIONS=
Modify it to read:
EXTRA_OPTIONS=--pack-interfaces --flush-timeout=30
If you are running multiple instances of rwflowpack, repeat the above steps for every router (sensor) on your network, since each router will have its own SNMP interface values.
Start the rwflowpack control script and allow rwflowpack to collect data.
$ rwflowpack start
You should see data appearing in the files $SILK_DATA_ROOTDIR/innull/*/*/*/*. For example, traffic captured at
2:14 pm EDT on October 4, 2003, from sensor Alpha will be in
$SILK_DATA_ROOTDIR/innull/2003/10/04/innull-Alpha_20031004.18. If data does not appear, do something to
generate traffic, such as browsing the web. If you still do not see data, make certain you have correctly configured
your router(s) to generate NetFlow v5 records and that the host and port to which the router is sending NetFlow
matches the host and port where rwflowpack is listening.
If you see the data files but they are empty, be patient. rwflowpack uses buffered input/output, which may hold records in memory. The data are flushed once the flush-timeout is reached, and at shutdown.
All the collected flows are in the innull data files. To find incoming traffic, you want to select all records for which the source IP is outside the monitored network’s address space and the destination IP is inside the address space. To select records, use the rwfilter command:
$ rwfilter --not-sipset=myips.set --dipset=myips.set \
           --type=all --pass=stdout \
       | rwuniq --fields=12-14
The --not-sipset and --dipset switches do the IP address filtering. Use the --type switch to select the all the data files (by default rwfilter looks only at the files for incoming routed data.) The --pass-output switch will direct the records that pass these IP filters to the standard output, which you pipe into another tool. For the records that pass the filter, you want to know which SNMP interfaces the records passed through in the border router(s). To get this information, run the rwuniq command, and select the fields containing the sensor and input and output SNMP indexes as the key.
Running the above command will produce something similar to:
     sensor|   in|  out|   Records|
      Alpha|    1|    2|     25139|
      Alpha|    1|    4|         8|
      Alpha|    1|    3|        80|
      Bravo|    8|    3|      4309|
where Alpha and Bravo are the names you assigned to the sensors (routers). From this output, you can see that SNMP interface 1 on the router named Alpha is the incoming interface, and interface 8 on Bravo is incoming. Note that a router connected to multiple ISPs will have multiple input interfaces.
Use the control script to stop the current rwflowpack.
You probably want to remove the data files you just created. This is the brute force method which will remove all the data files:
$ rwflowpack stop
$ find $SILK_DATA_ROOTDIR/innull -type f -print | xargs rm
In the Sensor Configuration file, set the external-interface and internal-interface attributes to the appropriate value(s). You can remove the --pack-interfaces and --flush-timeout switches from the EXTRA_OPTIONS line in the rwflowpack.conf file.
When available, rwsender and rwreceiver can use GnuTLS (the GNU Transport Layer Security Library, http://www.gnutls.org/) to encrypt and authenticate the communication between them. To use this feature, the rwsender and rwreceiver each need access to the PEM (Privacy Enhanced Mail) encoded root Certificate Authority (CA) file and to a program specific certificate and key, which can be either a DER (Distinguished Encoding Rules) encoded PKCS#12 file or a PEM encoded key file and a PEM encoded certificate file.
The communication between rwsender and rwreceiver will be established as long as the certificate chains for the PKCS#12 file or the key and certificate files resolve to the same CA. You may create a single program-specific key and certificate and use that on for all instances of rwsender and rwreceiver, or create a separate certificate/key pair for each instance of these programs.
We recommend creating a local certificate authority (CA) file, and creating program-specific certificates signed by that local CA. The local CA and program-specific certificates are copied onto the machines where rwsender and rwreceiver are running. The local CA acts as a shared secret: it is on both machines and it is used to verify the asymmetric keys between the rwsender and rwreceiver certificates.
If someone gains access to the local CA, that person would not be able to decipher the conversation between rwsender and rwreceiver, since the conversation is encrypted with a private key that was negotiated during the initialization of the TLS session.
However, anyone with access to the CA would be able to set up a new session with an rwsender (to download files) or an rwreceiver (to inject spoofed files). The GnuTLS certificates should be one part of your security; additional measures (such as firewall rules) should be enabled to mitigate these issues.
GnuTLS provides a tool called certtool to create the files, as described below. rwsender and rwreceiver also support using PKCS#12 files created with openssl.
To create a self-signed CA certificate, rootcert.pem, and its private key, rootkey.pem, fill in the following template with the appropriate information and save it to roottemp.cfg. You may also forgo the template, in which case certtool will prompt you for the information interactively.
# X.509 Certificate options
#
# DN options

# The organization of the subject.
organization = "ORGANIZATION"

# The organizational unit of the subject.
unit = "ORGANIZATIONAL_UNIT"

# The locality of the subject.
# locality =

# The state of the certificate owner, e.g., Pennsylvania
state = "STATE"

# The country of the subject. Two letter code, e.g., US
country = COUNTRY_CODE

# The common name of the certificate owner.
cn = "COMMON_NAME"

# The serial number of the certificate, e.g., 001
serial = 001

# In how many days, counting from today, this certificate will expire.
expiration_days = 366

# Whether this is a CA certificate or not
ca

# Whether this certificate will be used to sign data (needed
# in TLS DHE ciphersuites).
signing_key

# Whether this key will be used to sign other certificates.
cert_signing_key
Once you have filled in the above template, the following commands use it to create the CA key and certificate. (Remove the --template switch and its parameter if you are not using the template).
$ certtool --generate-privkey --outfile rootkey.pem \
        --template roottemp.cfg
$ certtool --generate-self-signed --load-privkey rootkey.pem \
        --outfile rootcert.pem --template roottemp.cfg
To create a program-specific certificate, cert.pem, and key, key.pem, you may fill in the following template and save it as progtemp.cfg, or have certtool prompt you for the information interactively.
# X.509 Certificate options
#
# DN options

# The organization of the subject.
organization = "ORGANIZATION"

# The organizational unit of the subject.
unit = "ORGANIZATIONAL_UNIT"

# The locality of the subject.
# locality =

# The state of the certificate owner, e.g., Pennsylvania
state = "STATE"

# The country of the subject. Two letter code, e.g., US
country = COUNTRY_CODE

# The common name of the certificate owner.
cn = "COMMON_NAME"

# The serial number of the certificate, a number, e.g., 002
serial = 002

# In how many days, counting from today, this certificate will expire.
expiration_days = 366

# Whether this certificate will be used to sign data (needed
# in TLS DHE ciphersuites).
signing_key

# Whether this certificate will be used to encrypt data (needed
# in TLS RSA ciphersuites). Note that it is preferred to use different
# keys for encryption and signing.
encryption_key
Use the following commands to create a certificate from the template and the root CA you created above:
$ certtool --generate-privkey --outfile key.pem \
        --template certtemp.cfg
$ certtool --generate-certificate --load-privkey key.pem \
        --outfile cert.pem --load-ca-certificate rootcert.pem  \
        --load-ca-privkey rootkey.pem --template certtemp.cfg
You may use the cert.pem and key.pem files you created above, or you may convert these to a single PKCS#12 file. The advantages of PKCS#12 is that it is a single file, it may be created with openssl, and it may be password protected.
The following certtool command converts the cert.pem and key.pem files from the previous section to a PKCS#12 file named pkcs12.der:
$ certtool --load-certificate cert.pem --load-privkey key.pem \
        --to-p12 --p12-name=NAME --outder --outfile pkcs12.der
where NAME is the name for the primary certificate and private key in the PKCS#12 file. To use an empty password with the PKCS#12 file, specify --empty-password.
If you choose to password protect the file, you must specify the password in the RWSENDER_TLS_PASSWORD environment variable prior to starting rwsender, and similarly RWRECEIVER_TLS_PASSWORD for rwreceiver.
SiLK 3.24
Copyright 2025 Carnegie Mellon University.
Licensed under a GNU GPL 2.0-style license, please see LICENSE.txt or contact permission@sei.cmu.edu for full terms.
June 1991
Copyright (C) 1989, 1991 Free Software Foundation, Inc.
51 Franklin Street, Fifth Floor, Boston, MA 02110-1301 USA
Everyone is permitted to copy and distribute verbatim copies of this license document, but changing it is not allowed.
Preamble
The licenses for most software are designed to take away your freedom to share and change it. By contrast, the GNU General Public License is intended to guarantee your freedom to share and change free software–to make sure the software is free for all its users. This General Public License applies to most of the Free Software Foundation’s software and to any other program whose authors commit to using it. (Some other Free Software Foundation software is covered by the GNU Library General Public License instead.) You can apply it to your programs, too.
When we speak of free software, we are referring to freedom, not price. Our General Public Licenses are designed to make sure that you have the freedom to distribute copies of free software (and charge for this service if you wish), that you receive source code or can get it if you want it, that you can change the software or use pieces of it in new free programs; and that you know you can do these things.
To protect your rights, we need to make restrictions that forbid anyone to deny you these rights or to ask you to surrender the rights. These restrictions translate to certain responsibilities for you if you distribute copies of the software, or if you modify it.
For example, if you distribute copies of such a program, whether gratis or for a fee, you must give the recipients all the rights that you have. You must make sure that they, too, receive or can get the source code. And you must show them these terms so they know their rights.
We protect your rights with two steps: (1) copyright the software, and (2) offer you this license which gives you legal permission to copy, distribute and/or modify the software.
Also, for each author’s protection and ours, we want to make certain that everyone understands that there is no warranty for this free software. If the software is modified by someone else and passed on, we want its recipients to know that what they have is not the original, so that any problems introduced by others will not reflect on the original authors’ reputations.
Finally, any free program is threatened constantly by software patents. We wish to avoid the danger that redistributors of a free program will individually obtain patent licenses, in effect making the program proprietary. To prevent this, we have made it clear that any patent must be licensed for everyone’s free use or not licensed at all.
The precise terms and conditions for copying, distribution and modification follow.
TERMS AND CONDITIONS FOR COPYING, DISTRIBUTION AND MODIFICATION
0. This License applies to any program or other work which contains a notice placed by the copyright holder saying it may be distributed under the terms of this General Public License. The ”Program”, below, refers to any such program or work, and a ”work based on the Program” means either the Program or any derivative work under copyright law: that is to say, a work containing the Program or a portion of it, either verbatim or with modifications and/or translated into another language. (Hereinafter, translation is included without limitation in the term ”modification”.) Each licensee is addressed as ”you”.
Activities other than copying, distribution and modification are not covered by this License; they are outside its scope. The act of running the Program is not restricted, and the output from the Program is covered only if its contents constitute a work based on the Program (independent of having been made by running the Program). Whether that is true depends on what the Program does.
1. You may copy and distribute verbatim copies of the Program’s source code as you receive it, in any medium, provided that you conspicuously and appropriately publish on each copy an appropriate copyright notice and disclaimer of warranty; keep intact all the notices that refer to this License and to the absence of any warranty; and give any other recipients of the Program a copy of this License along with the Program.
You may charge a fee for the physical act of transferring a copy, and you may at your option offer warranty protection in exchange for a fee.
2. You may modify your copy or copies of the Program or any portion of it, thus forming a work based on the Program, and copy and distribute such modifications or work under the terms of Section 1 above, provided that you also meet all of these conditions:
“ a) You must cause the modified files to carry prominent notices stating that you changed the files and the date of any change.
b) You must cause any work that you distribute or publish, that in whole or in part contains or is derived from the Program or any part thereof, to be licensed as a whole at no charge to all third parties under the terms of this License.
c) If the modified program normally reads commands interactively when run, you must cause it, when started running for such interactive use in the most ordinary way, to print or display an announcement including an appropriate copyright notice and a notice that there is no warranty (or else, saying that you provide a warranty) and that users may redistribute the program under these conditions, and telling the user how to view a copy of this License. (Exception: if the Program itself is interactive but does not normally print such an announcement, your work based on the Program is not required to print an announcement.)
These requirements apply to the modified work as a whole. If identifiable sections of that work are not derived from the Program, and can be reasonably considered independent and separate works in themselves, then this License, and its terms, do not apply to those sections when you distribute them as separate works. But when you distribute the same sections as part of a whole which is a work based on the Program, the distribution of the whole must be on the terms of this License, whose permissions for other licensees extend to the entire whole, and thus to each and every part regardless of who wrote it.
Thus, it is not the intent of this section to claim rights or contest your rights to work written entirely by you; rather, the intent is to exercise the right to control the distribution of derivative or collective works based on the Program.
In addition, mere aggregation of another work not based on the Program with the Program (or with a work based on the Program) on a volume of a storage or distribution medium does not bring the other work under the scope of this License.
3. You may copy and distribute the Program (or a work based on it, under Section 2) in object code or executable form under the terms of Sections 1 and 2 above provided that you also do one of the following:
“ a) Accompany it with the complete corresponding machine-readable source code, which must be distributed under the terms of Sections 1 and 2 above on a medium customarily used for software interchange; or,
b) Accompany it with a written offer, valid for at least three years, to give any third party, for a charge no more than your cost of physically performing source distribution, a complete machine-readable copy of the corresponding source code, to be distributed under the terms of Sections 1 and 2 above on a medium customarily used for software interchange; or,
c) Accompany it with the information you received as to the offer to distribute corresponding source code. (This alternative is allowed only for noncommercial distribution and only if you received the program in object code or executable form with such an offer, in accord with Subsection b above.)
The source code for a work means the preferred form of the work for making modifications to it. For an executable work, complete source code means all the source code for all modules it contains, plus any associated interface definition files, plus the scripts used to control compilation and installation of the executable. However, as a special exception, the source code distributed need not include anything that is normally distributed (in either source or binary form) with the major components (compiler, kernel, and so on) of the operating system on which the executable runs, unless that component itself accompanies the executable.
If distribution of executable or object code is made by offering access to copy from a designated place, then offering equivalent access to copy the source code from the same place counts as distribution of the source code, even though third parties are not compelled to copy the source along with the object code.
4. You may not copy, modify, sublicense, or distribute the Program except as expressly provided under this License. Any attempt otherwise to copy, modify, sublicense or distribute the Program is void, and will automatically terminate your rights under this License. However, parties who have received copies, or rights, from you under this License will not have their licenses terminated so long as such parties remain in full compliance.
5. You are not required to accept this License, since you have not signed it. However, nothing else grants you permission to modify or distribute the Program or its derivative works. These actions are prohibited by law if you do not accept this License. Therefore, by modifying or distributing the Program (or any work based on the Program), you indicate your acceptance of this License to do so, and all its terms and conditions for copying, distributing or modifying the Program or works based on it.
6. Each time you redistribute the Program (or any work based on the Program), the recipient automatically receives a license from the original licensor to copy, distribute or modify the Program subject to these terms and conditions. You may not impose any further restrictions on the recipients’ exercise of the rights granted herein. You are not responsible for enforcing compliance by third parties to this License.
7. If, as a consequence of a court judgment or allegation of patent infringement or for any other reason (not limited to patent issues), conditions are imposed on you (whether by court order, agreement or otherwise) that contradict the conditions of this License, they do not excuse you from the conditions of this License. If you cannot distribute so as to satisfy simultaneously your obligations under this License and any other pertinent obligations, then as a consequence you may not distribute the Program at all. For example, if a patent license would not permit royalty-free redistribution of the Program by all those who receive copies directly or indirectly through you, then the only way you could satisfy both it and this License would be to refrain entirely from distribution of the Program.
If any portion of this section is held invalid or unenforceable under any particular circumstance, the balance of the section is intended to apply and the section as a whole is intended to apply in other circumstances.
It is not the purpose of this section to induce you to infringe any patents or other property right claims or to contest validity of any such claims; this section has the sole purpose of protecting the integrity of the free software distribution system, which is implemented by public license practices. Many people have made generous contributions to the wide range of software distributed through that system in reliance on consistent application of that system; it is up to the author/donor to decide if he or she is willing to distribute software through any other system and a licensee cannot impose that choice.
This section is intended to make thoroughly clear what is believed to be a consequence of the rest of this License.
8. If the distribution and/or use of the Program is restricted in certain countries either by patents or by copyrighted interfaces, the original copyright holder who places the Program under this License may add an explicit geographical distribution limitation excluding those countries, so that distribution is permitted only in or among countries not thus excluded. In such case, this License incorporates the limitation as if written in the body of this License.
9. The Free Software Foundation may publish revised and/or new versions of the General Public License from time to time. Such new versions will be similar in spirit to the present version, but may differ in detail to address new problems or concerns.
Each version is given a distinguishing version number. If the Program specifies a version number of this License which applies to it and ”any later version”, you have the option of following the terms and conditions either of that version or of any later version published by the Free Software Foundation. If the Program does not specify a version number of this License, you may choose any version ever published by the Free Software Foundation.
10. If you wish to incorporate parts of the Program into other free programs whose distribution conditions are different, write to the author to ask for permission. For software which is copyrighted by the Free Software Foundation, write to the Free Software Foundation; we sometimes make exceptions for this. Our decision will be guided by the two goals of preserving the free status of all derivatives of our free software and of promoting the sharing and reuse of software generally.
NO WARRANTY
11. BECAUSE THE PROGRAM IS LICENSED FREE OF CHARGE, THERE IS NO WARRANTY FOR THE PROGRAM, TO THE EXTENT PERMITTED BY APPLICABLE LAW. EXCEPT WHEN OTHERWISE STATED IN WRITING THE COPYRIGHT HOLDERS AND/OR OTHER PARTIES PROVIDE THE PROGRAM ”AS IS” WITHOUT WARRANTY OF ANY KIND, EITHER EXPRESSED OR IMPLIED, INCLUDING, BUT NOT LIMITED TO, THE IMPLIED WARRANTIES OF MERCHANTABILITY AND FITNESS FOR A PARTICULAR PURPOSE. THE ENTIRE RISK AS TO THE QUALITY AND PERFORMANCE OF THE PROGRAM IS WITH YOU. SHOULD THE PROGRAM PROVE DEFECTIVE, YOU ASSUME THE COST OF ALL NECESSARY SERVICING, REPAIR OR CORRECTION.
12. IN NO EVENT UNLESS REQUIRED BY APPLICABLE LAW OR AGREED TO IN WRITING WILL ANY COPYRIGHT HOLDER, OR ANY OTHER PARTY WHO MAY MODIFY AND/OR REDISTRIBUTE THE PROGRAM AS PERMITTED ABOVE, BE LIABLE TO YOU FOR DAMAGES, INCLUDING ANY GENERAL, SPECIAL, INCIDENTAL OR CONSEQUENTIAL DAMAGES ARISING OUT OF THE USE OR INABILITY TO USE THE PROGRAM (INCLUDING BUT NOT LIMITED TO LOSS OF DATA OR DATA BEING RENDERED INACCURATE OR LOSSES SUSTAINED BY YOU OR THIRD PARTIES OR A FAILURE OF THE PROGRAM TO OPERATE WITH ANY OTHER PROGRAMS), EVEN IF SUCH HOLDER OR OTHER PARTY HAS BEEN ADVISED OF THE POSSIBILITY OF SUCH DAMAGES.
END OF TERMS AND CONDITIONS
How to Apply These Terms to Your New Programs
If you develop a new program, and you want it to be of the greatest possible use to the public, the best way to achieve this is to make it free software which everyone can redistribute and change under these terms.
To do so, attach the following notices to the program. It is safest to attach them to the start of each source file to most effectively convey the exclusion of warranty; and each file should have at least the ”copyright” line and a pointer to where the full notice is found.
“ One line to give the program’s name and a brief idea of what it does. Copyright (C) ¡year¿ ¡name of author¿
This program is free software; you can redistribute it and/or modify it under the terms of the GNU General Public License as published by the Free Software Foundation; either version 2 of the License, or (at your option) any later version.
This program is distributed in the hope that it will be useful, but WITHOUT ANY WARRANTY; without even the implied warranty of MERCHANTABILITY or FITNESS FOR A PARTICULAR PURPOSE. See the GNU General Public License for more details.
You should have received a copy of the GNU General Public License along with this program; if not, write to the Free Software Foundation, Inc., 59 Temple Place, Suite 330, Boston, MA 02111-1307 USA
Also add information on how to contact you by electronic and paper mail.
If the program is interactive, make it output a short notice like this when it starts in an interactive mode:
“ Gnomovision version 69, Copyright (C) year name of author Gnomovision comes with ABSOLUTELY NO WARRANTY; for details type ‘show w’. This is free software, and you are welcome to redistribute it under certain conditions; type ‘show c’ for details.
The hypothetical commands ‘show w’ and ‘show c’ should show the appropriate parts of the General Public License. Of course, the commands you use may be called something other than ‘show w’ and ‘show c’; they could even be mouse-clicks or menu items–whatever suits your program.
You should also get your employer (if you work as a programmer) or your school, if any, to sign a ”copyright disclaimer” for the program, if necessary. Here is a sample; alter the names:
“ Yoyodyne, Inc., hereby disclaims all copyright interest in the program ‘Gnomovision’ (which makes passes at compilers) written by James Hacker.
signature of Ty Coon, 1 April 1989 Ty Coon, President of Vice
This General Public License does not permit incorporating your program into proprietary programs. If your program is a subroutine library, you may consider it more useful to permit linking proprietary applications with the library. If this is what you want to do, use the GNU Library General Public License instead of this License.
SiLK 3.24 includes and/or can make use of certain third party software (”Third Party Software”). The Third Party Software that is used by SiLK 3.24 is dependent upon your system configuration, but typically includes the software identified in this LICENSE.txt file, and/or described in the documentation and/or read me file. By using SiLK 3.24, you agree to comply with any and all relevant Third Party Software terms and conditions contained in any such Third Party Software or separate license file distributed with such Third Party Software. The parties who own the Third Party Software (”Third Party Licensors”) are intended third party beneficiaries to this License with respect to the terms applicable to their Third Party Software. Third Party Software licenses only apply to the Third Party Software and not any other portion of SiLK 3.24 or SiLK 3.24 as a whole.
This material is based upon work funded and supported by the Department of Homeland Security under Contract No. FA8702-15-D-0002 with Carnegie Mellon University for the operation of the Software Engineering Institute, a federally funded research and development center sponsored by the United States Department of Defense.
The view, opinions, and/or findings contained in this material are those of the author(s) and should not be construed as an official Government position, policy, or decision, unless designated by other documentation.
References herein to any specific entity, product, process, or service by trade name, trademark, manufacturer, or otherwise, does not necessarily constitute or imply its endorsement, recommendation, or favoring by Carnegie Mellon University or its Software Engineering Institute nor of Carnegie Mellon University - Software Engineering Institute by any such named or represented entity.
NO WARRANTY. THIS CARNEGIE MELLON UNIVERSITY AND SOFTWARE ENGINEERING INSTITUTE MATERIAL IS FURNISHED ON AN ”AS-IS” BASIS. CARNEGIE MELLON UNIVERSITY MAKES NO WARRANTIES OF ANY KIND, EITHER EXPRESSED OR IMPLIED, AS TO ANY MATTER INCLUDING, BUT NOT LIMITED TO, WARRANTY OF FITNESS FOR PURPOSE OR MERCHANTABILITY, EXCLUSIVITY, OR RESULTS OBTAINED FROM USE OF THE MATERIAL. CARNEGIE MELLON UNIVERSITY DOES NOT MAKE ANY WARRANTY OF ANY KIND WITH RESPECT TO FREEDOM FROM PATENT, TRADEMARK, OR COPYRIGHT INFRINGEMENT.
[DISTRIBUTION STATEMENT A] This material has been approved for public release and unlimited distribution. Please see Copyright notice for non-US Government use and distribution.
GOVERNMENT PURPOSE RIGHTS – Software and Software Documentation
Contract No.: FA8702-15-D-0002 Contractor Name: Carnegie Mellon University Contractor Address: 4500 Fifth Avenue, Pittsburgh, PA 15213
The Government’s rights to use, modify, reproduce, release, perform, display, or disclose this software are restricted by paragraph (b)(2) of the Rights in Noncommercial Computer Software and Noncommercial Computer Software Documentation clause contained in the above identified contract. No restrictions apply after the expiration date shown above. Any reproduction of the software or portions thereof marked with this legend must also reproduce the markings.
CERT® and Carnegie Mellon® are registered in the U.S. Patent and Trademark Office by Carnegie Mellon University.
DM25-0915